To configure the first system in the cluster, perform the following steps.
Start
Managed File Transfer
and login to the browser-based Administrator.
All systems in the cluster are required to use the same external database (SQL Server or Oracle in network mode). The Switch Database wizard located in the
System
Database Configuration
section will guide you through the process to utilize an external database. Data in the existing database can be automatically migrated to the new external database.
All systems in the cluster must point to the same set of shared folders for storing documents, certificates and other user files. It is recommended that these folder paths are pointing to a shared network location. Follow the steps below:
Navigate to the
System
Global Settings
page. On the
Data
tab, specify the shared network folders for each feature.
Navigate to the
Logs
Log Settings
page and configure the Logs Directory to point to a shared network folder.
Navigate to the
Services
Shared Drive Settings
page and configure Shared Drive Directory to point to a shared network folder.
If Web Users need to authenticate using digital certificates for HTTPS or FTPS protocols, then the locations of the SSL Key Stores should point to a shared network location that all systems in the cluster have access to. To specify the Key Store locations select
Encryption
from the main menu and choose the
SSL Certificate Manager
option, and then select
Preferences
. Specify the shared network locations for the key stores on the Default Trusted Certificates and Default Private Keys.
After the configuration is completed in the steps above, verify that there are no active sessions on this installation. Then you should shut down the
Managed File Transfer
service or subsystem.
Go to the file system of the server that
Managed File Transfer
is installed on and open the file named
[InstallationDirectory]/config/cluster.xml
, where [InstallationDirectory] is the location that
Managed File Transfer
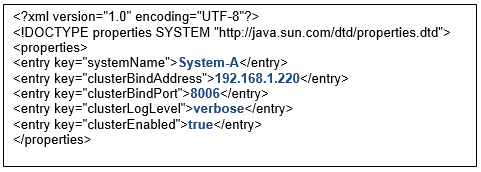
is installed to. The following properties need to be configured in this file:
systemName
- A unique name to identify this system in the cluster. The maximum system name length is 20 characters.
clusterBindAddress
- The IP address which
Managed File Transfer
will listen on to communicate with other
Managed File Transfer
systems in a cluster. This IP address must be valid on this server which
Managed File Transfer
is installed to.
clusterBindPort
- The port number which
Managed File Transfer
will listen on to communicate with other
Managed File Transfer
systems in a cluster. For example, 8006.
clusterLogLevel
- The log level of “info” will record all standard log messages from each system in the cluster. When the log level is set to “verbose” the log will also record all of the system-to-system messages used to manage the cluster. While initially testing clustering within your environment, it is recommended to keep the log level at “verbose” to get more detailed messages.
clusterEnabled
- This must be set to “true”.
The following image shows an example of
cluster.xml
file.
After configuring
cluster.xml
, you can restart
Managed File Transfer
.
This system will assume the coordinator role since it is the first
Managed File Transfer
system started in the cluster.
Review the
Managed File Transfer
global log for any errors. Sign into the Administrator and navigate to
Logs
Server Log Viewer
. The log file is named
informatica_<systemName>.log
, where
systemName
is the unique name to identify this system in the cluster that was specified previously.