Table of Contents

Search

  1. Preface
  2. Part 1: Installation Getting Started
  3. Part 2: Before You Install the Services
  4. Part 3: Run the Services Installer
  5. Part 4: After You Install the Services
  6. Part 5: Informatica Client Installation
  7. Part 6: Uninstallation
  8. Appendix A: Starting and Stopping Informatica Services
  9. Appendix B: Connecting to Databases from UNIX or Linux
  10. Appendix C: Connecting to Databases from Windows
  11. Appendix D: Updating the DynamicSections Parameter of a DB2 Database

Installation for PowerCenter and Data Quality

Installation for PowerCenter and Data Quality

Joining a Domain

Joining a Domain

You can join a domain if you are installing on multiple machines and you have created a domain on another machine.
  1. Log in to the machine with a system user account.
  2. Close all other applications.
  3. Go to the root of the directory for the installation files and run install.bat as administrator.
    To run the file as administrator, right-click the install.bat file and select
    Run as administrator
    .
    If you do not run the installer as administrator, the Windows system administrator might encounter issues when accessing files in the Informatica installation directory.
    The
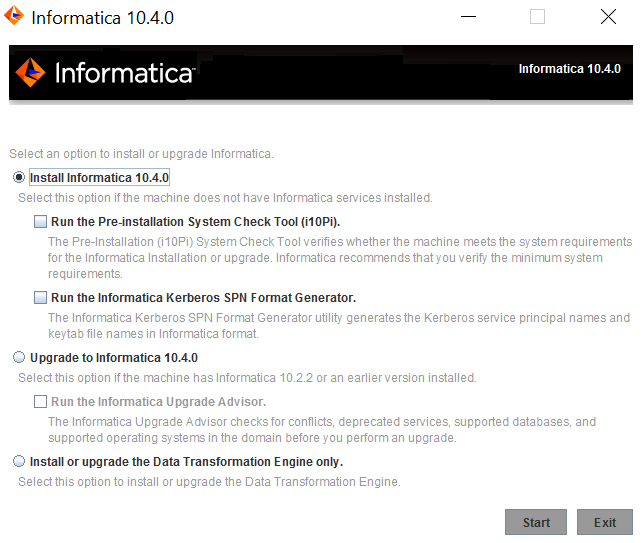
    Informatica 10.4.0
    page appears.
  4. Select
    Install Informatica 10.4.0
    .
    This image describes about the options to install Informatica.
    Informatica provides utilities to facilitate the Informatica services installation process. Run the following utilities before you install Informatica services:
    • Pre-Installation (i10Pi) System Check Tool. Verifies whether the machine on which you are installing Informatica services meets the system requirements for installation.
      For more information about running the Pre-Installation (i10Pi) System Check Tool, see Run the Pre-Installation (i10Pi) System Check Tool in Graphical Mode.
    • Informatica Kerberos SPN Format Generator. Creates a list of the Kerberos service principal names and keytab file names required to run Informatica services on a network with Kerberos authentication.
      If you plan to join a domain that uses Kerberos authentication, you must generate the service principal names and keytab files for the node you create and service that will run on the node.
    You can use the installer to run the utilities before you install informatica services. After you finish running a utility, restart the installer to run the next utility or install informatica services.
  5. Click
    Start
    .
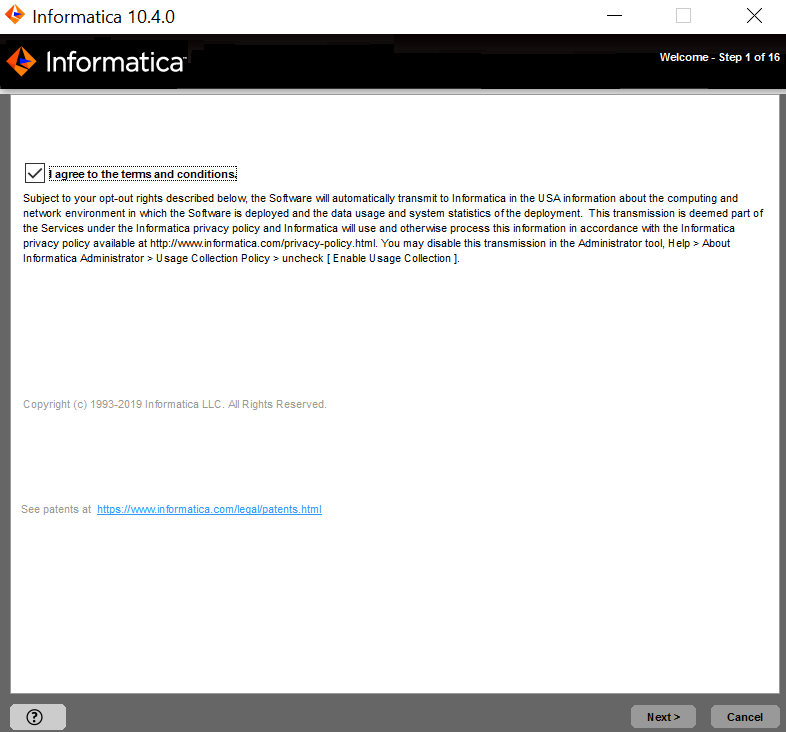
  6. Read the terms and conditions for Informatica installation and the product usage toolkit and select
    I agree to the terms and conditions
    .
    This image describes the Informatica installation terms and conditions.
    Informatica DiscoveryIQ is a product usage tool that sends routine reports on data usage and system statistics to Informatica. Informatica DiscoveryIQ uploads data to Informatica 15 minutes after you install and configure Informatica domain. Thereafter, the domain sends the data every 30 days. You can choose to disable usage statistics from the Administrator tool.
  7. Click
    Next
    .
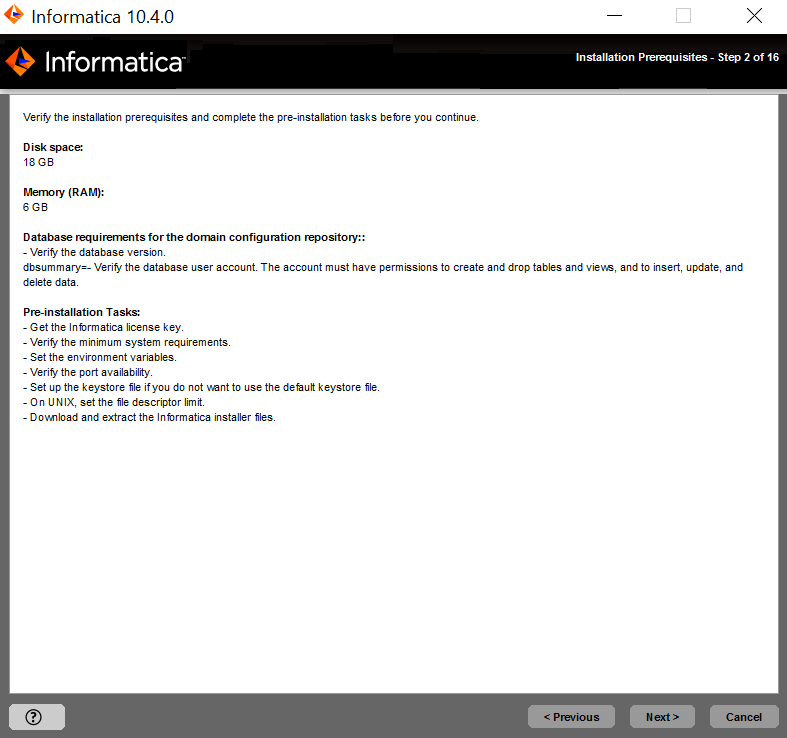
    The
    Installation Prerequisites
    page displays the installation requirements. Verify that all requirements are met before you continue the installation.
    This images describes about the installation requirments and the tasks to perform before you install.
  8. Click
    Next
    .
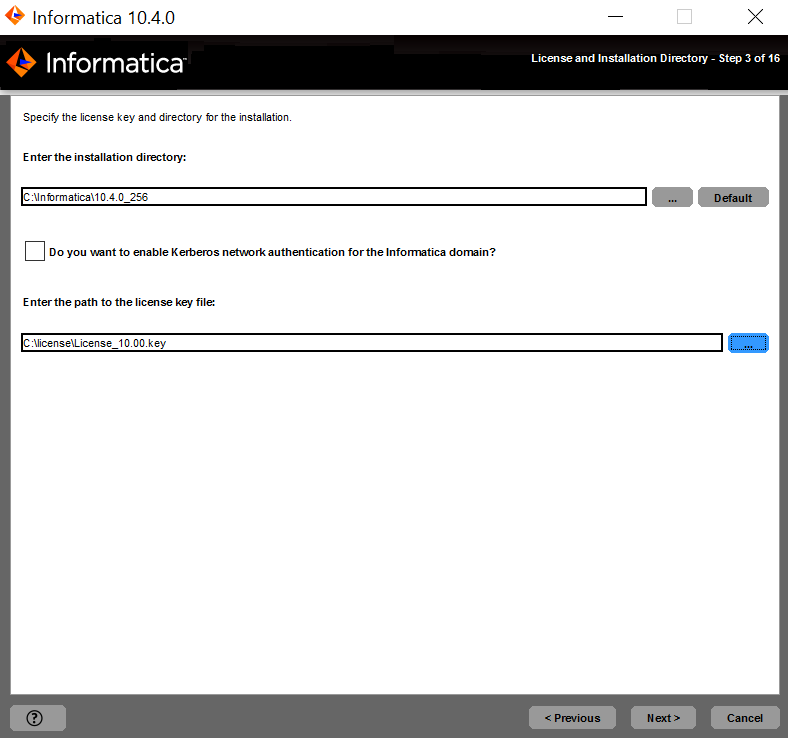
    The
    License and Installation Directory
    page appears.
    This image describes about the license key, installation directory, and enabling kerberos network for the Informatica domain.
  9. Enter the Informatica license key and the installation directory.
    The following table describes the license key and directory that you specify for the informatica services installation:
    Property
    Description
    License key file
    Path and file name of the Informatica license key.
    Installation directory
    Absolute path for the installation directory. The installation directory must be on the machine where you are installing Informatica. The directory names in the path must not contain spaces or the following special characters:
    @ | * $ # ! % ( ) { } [ ]
    Informatica recommends using alphanumeric characters in the installation directory path. If you use a special character such as á or €, unexpected results might occur at run time.
  10. To join an Informatica domain that runs on a network with Kerberos authentication, select
    Enable Kerberos Network Authentication
    .
  11. Click
    Next
    .
    If you enabled Kerberos network authentication, the
    Network Security - Service Principal Level
    page appears.
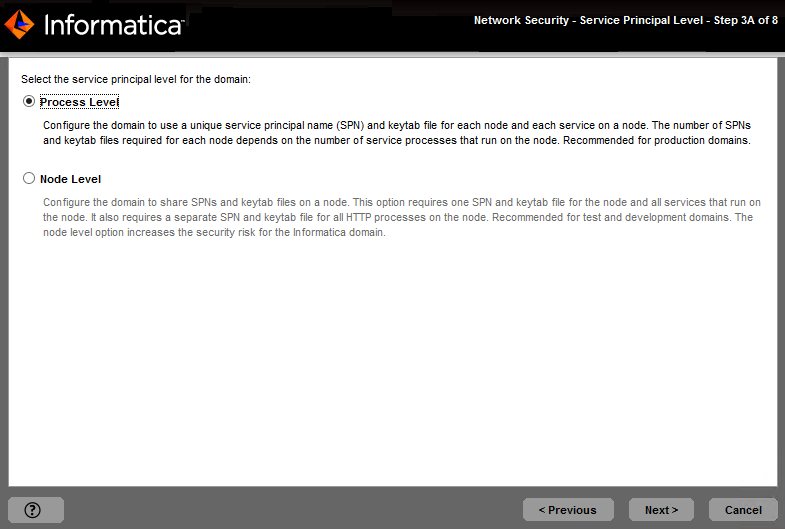
    This image describes the network security information.
    If you did not enable Kerberos network authentication, the
    Pre-Installation Summary
    page appears. Skip to step 16
  12. On the
    Network Security - Service Principal Level
    page, select the service principal level of the domain that you plan to join.
    All nodes in the domain must use the same service principal level. When you join a node to a domain, select the same service principal level used by the gateway node in the domain.
    The following table describes the service principal levels that you can select:
    Level
    Description
    Process Level
    Configures the domain to use a unique service principal name (SPN) and keytab file for each node and each application service on a node.
    The number of SPNs and keytab files required for each node depends on the number of application service processes that run on the node. Use the process level option for domains that require a high level of security, such as productions domains.
    Node Level
    Configures the domain to share SPNs and keytab files on a node.
    This option requires one SPN and keytab file for the node and all application services that run on the node. It also requires a separate SPN and keytab file for all HTTP processes on the node.
    Use the node level option for domains that do not require a high level of security, such as test and development domains.
  13. Click
    Next
    .
    The
    Network Security - Kerberos Authentication
    page appears.
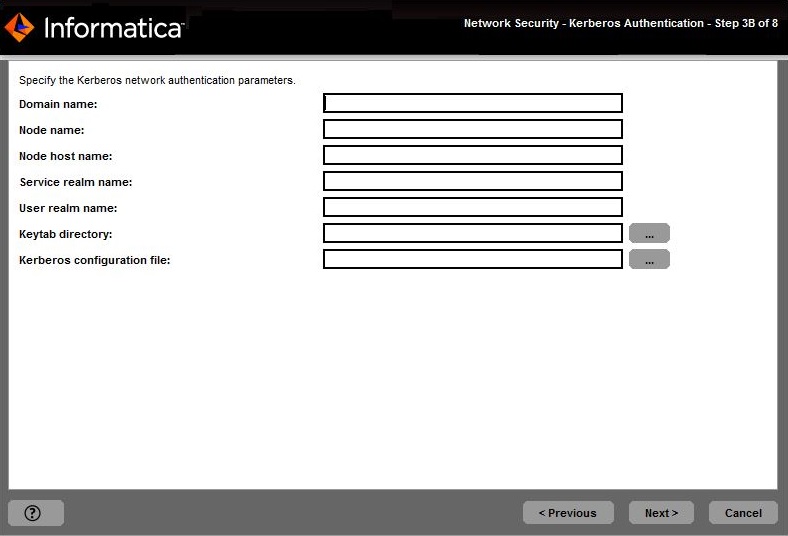
    This image describes about the network security kerberos authentication parameters.
  14. Enter the domain and keytab information required for Kerberos authentication.
    The following table describes the information you must provide about the domain that you plan to join and the node to create during installation:
    Property
    Description
    Domain name
    Name of the domain to join.
    The name must not exceed 128 characters and must be 7-bit ASCII only. The name cannot contain a space or any of the following characters:
    ` % * + ; " ? , < > \ /
    Node name
    Name of the node to create.
    Node host name
    Fully qualified host name or IP address of the machine on which to create the node.
    The node host name cannot contain the underscore (_) character. Do not use localhost. The host name must explicitly identify the machine.
    The following table describes the Kerberos realm and keytab information that you must provide:
    Property
    Description
    Service realm name
    Name of the Kerberos realm that the domain uses to authenticate users. The realm name must be in uppercase and is case-sensitive.
    To configure Kerberos cross realm authentication, specify the name of each Kerberos realm that the domain uses to authenticate users, separated by a comma. For example:
    COMPANY.COM,EAST.COMPANY.COM,WEST.COMPANY.COM
    Use an asterisk as a wildcard character before a realm name to include all realms that include the name. For example:
    *EAST.COMPANY.COM
    User realm name
    Name of the Kerberos realm that the domain uses to authenticate users. The realm name must be in uppercase and is case-sensitive.
    To configure Kerberos cross realm authentication, specify the name of each Kerberos realm that the domain uses to authenticate users, separated by a comma. For example:
    COMPANY.COM,EAST.COMPANY.COM,WEST.COMPANY.COM
    Use an asterisk as a wildcard character before a realm name to include all realms that include the name. For example:
    *EAST.COMPANY.COM
    Keytab directory
    Directory where all keytab files for the Informatica domain are stored. The name of a keytab file in the Informatica domain must follow a format set by Informatica.
    Kerberos configuration file
    Path and file name of the Kerberos configuration file. Informatica requires the following name for the Kerberos configuration file:
    krb5.conf
  15. Click
    Next
    .
    The
    Pre-Installation Summary
    page appears.
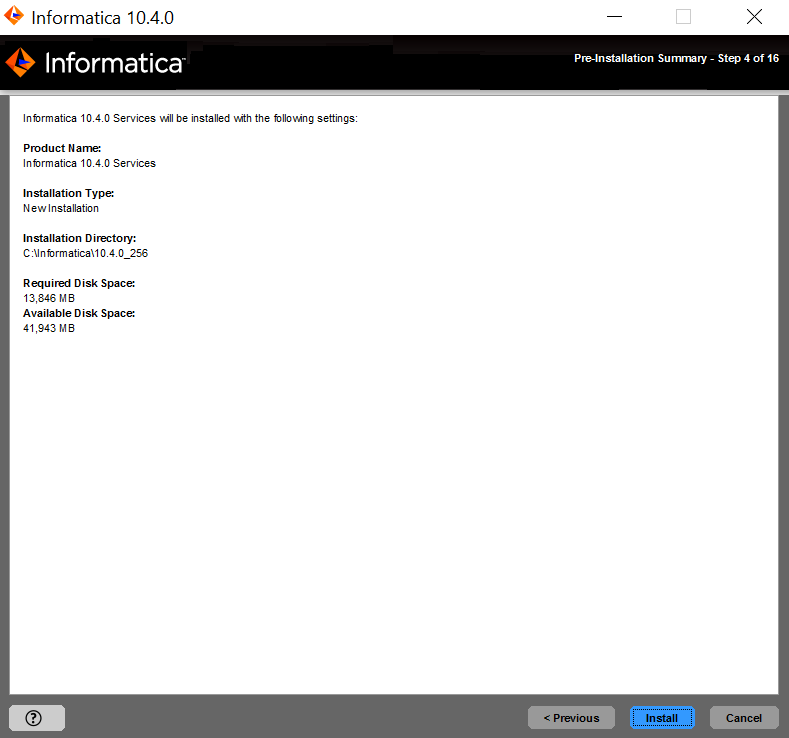
    This image describes the pre-installation summary.
  16. Review the installation information, and click
    Install
    to continue.
    The installer copies the Informatica files to the installation directory. After the installer copies the files, the
    Domain Selection
    page appears.
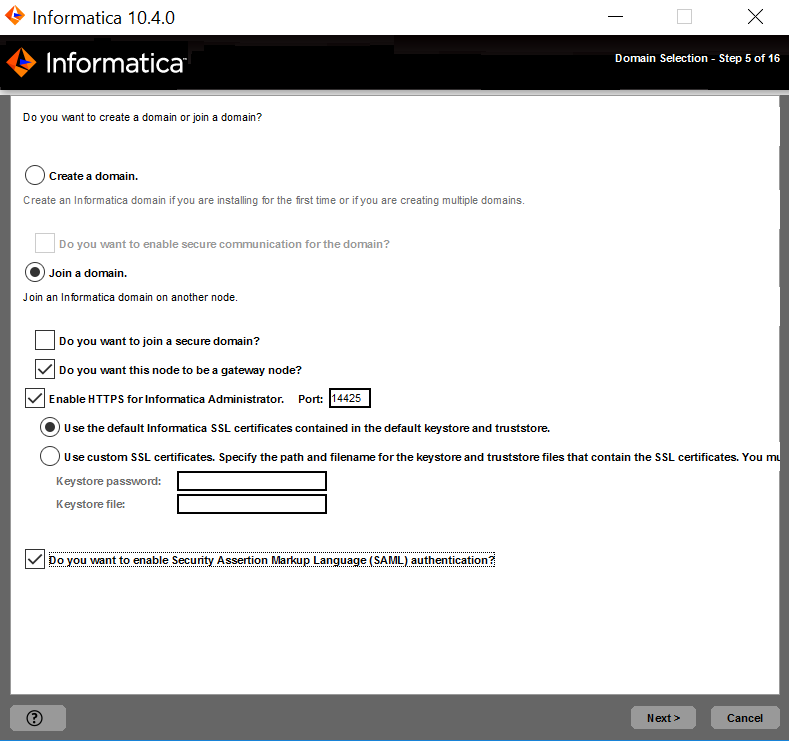
    This image describes about enabling secure communication when you join a domain.
  17. Select
    Join a Domain
    .
  18. Specify whether the domain you want to join has secure communication enabled.
    To join a domain with secure communication enabled, select
    Join a secure domain
    . To join a domain that does not have secure communication enabled, clear the option.
  19. Select the type of node that you want to create.
    To create a gateway node, select
    Configure this node as a gateway
    . To create a worker node, clear the option.
    If you configure the node as a gateway, you can enable a secure connection to the Informatica Administrator.
  20. To secure the connection to Informatica Administrator, select
    Enable HTTPS for Informatica Administrator
    .
    The following table describes the properties that you set for a secure connection to the Administrator tool:
    Property
    Description
    Enable HTTPS for Informatica Administrator
    Select this option to secure the connection to Informatica Administrator. To use an unsecure HTTP connection, clear the option.
    By default, if secure communication is enabled for the domain, the installer enables this option. You can also enable this option even if you do not enable secure communication for the domain.
    Port
    The port to use for communication between Informatica Administrator and the Service Manager.
    Use a keystore file generated by the installer
    Use a self-signed keystore file generated by the installer. The installer creates a keystore file named Default.keystore in the following location:
    <Informatica installation directory>\tomcat\conf\
    Specify a keystore file and password
    Use a keystore file that you create. You can use a keystore file with a self-signed certificate or a certificate signed by a certification authority.
    Keystore password
    A plain-text password for the keystore file. Required if you use a keystore file that you create.
    Keystore file
    Path and file name of the keystore file. Required if you use a keystore file that you create.
  21. To configure Security Assertion Markup Language (SAML)-based single sign-on (SSO) support for web-based Informatica applications in an Informatica domain,
    Enable SAML authentication
    .
    If you enabled Kerberos network authentication, you cannot configure SAML authentication.
  22. Click
    Next
    .
    If you selected the
    Enable SAML authentication
    option, the
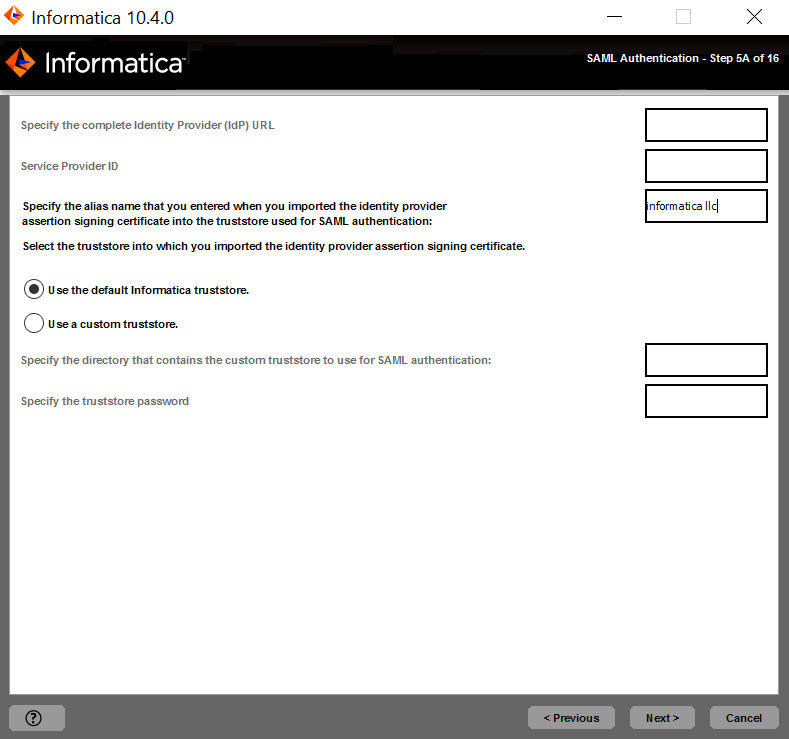
    SAML Authentication
    page appears.
  23. Enter the Identity Provider URL for the domain.
  24. Enter the identity provider assertion signing certificate alias name.
  25. Specify whether to use the default Informatica SSL certificates or to use your SSL certificates to enable secure communication in the domain.
    The following table describes the SSL certificate options for SAML authentication:
    Option
    Description
    Use the default Informatica SSL certificate file.
    Select to use the default Informatica truststore file for SAML authentication.
    Enter the location of the SSL certificate file.
    Select to use a custom truststore file for SAML authentication. Specify the directory containing the custom truststore file on gateway nodes within the domain. Specify the directory only, not the full path to the file.
  26. If you provide the security certificates, specify the location and passwords of the keystore and truststore files.
    The following table describes the location and password of the truststore file:
    Property
    Description
    Truststore Directory
    Specify the directory containing the custom truststore file on gateway nodes within the domain. Specify the directory only, not the full path to the file.
    Truststore Password
    The password for the custom truststore file.
  27. Click
    Next
    .
    If the domain you want to join is secure, the
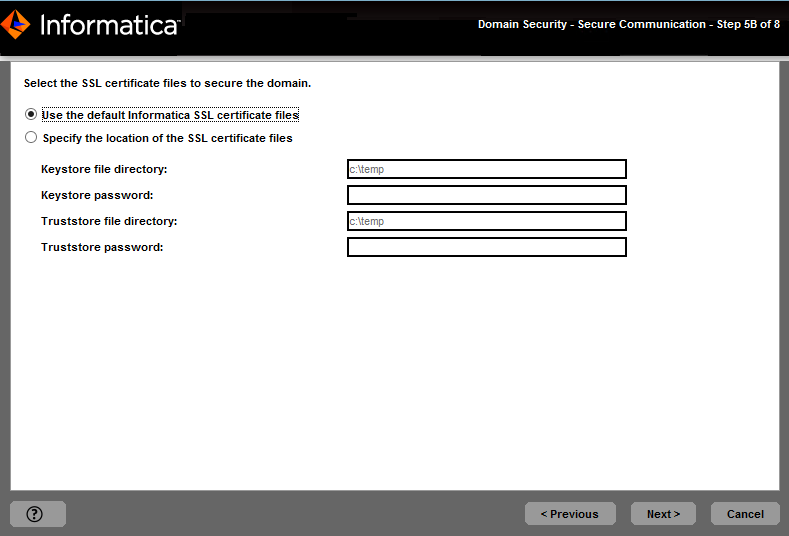
    Domain Security - Secure Communication
    page appears.
    This image describes about selecting the security certificates to secure the domain
    If the domain you want to join is not secure, the
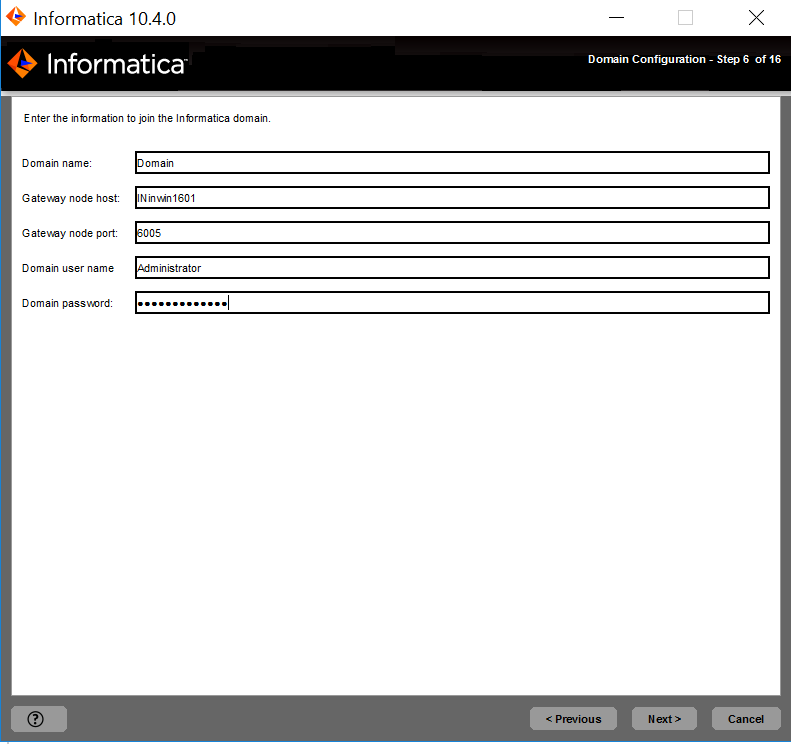
    Domain Configuration
    page appears.
    This image describes about the information you must enter for the domain configuration.
    Skip to step 29.
  28. On the
    Domain Security - Secure Communication
    page, specify whether to use the default Informatica SSL certificates or to use your SSL certificates to enable secure communication in the domain.
    To use the default SSL certificates provided by Informatica, select
    Use the default Informatica SSL certificate files
    .
    To use your SSL certificate, select
    Specify the location of the SSL certificate files
    and specify the directories where the SSL certificate files are located.
    All nodes in the domain must use the same SSL certificates. When you join a node to a domain, specify the same SSL certificates used by the gateway node in the domain.
    The following table describes the parameters that you must enter for the SSL certificate files:
    Property
    Description
    Keystore file directory
    Directory that contains the keystore files. The directory must contain files named infa_keystore.jks and infa_keystore.pem.
    Keystore password
    Password for the keystore infa_keystore.jks.
    Truststore file directory
    Directory that contains the truststore files. The directory must contain files named infa_truststore.jks and infa_truststore.pem.
    Truststore password
    Password for the infa_truststore.jks file.
    Click
    Next
    .
  29. Enter the information for the domain that you want to join.
    The following table describes the properties that you specify for the domain:
    Property
    Description
    Domain name
    Name of the domain to join.
    Gateway node host
    Host name of the machine that hosts the gateway node for the domain.
    Gateway node port
    Port number of the gateway node.
    Domain user name
    User name of the administrator for the domain you want to join.
    Domain password
    Password for the domain administrator.
  30. Click
    Next
    .
    The
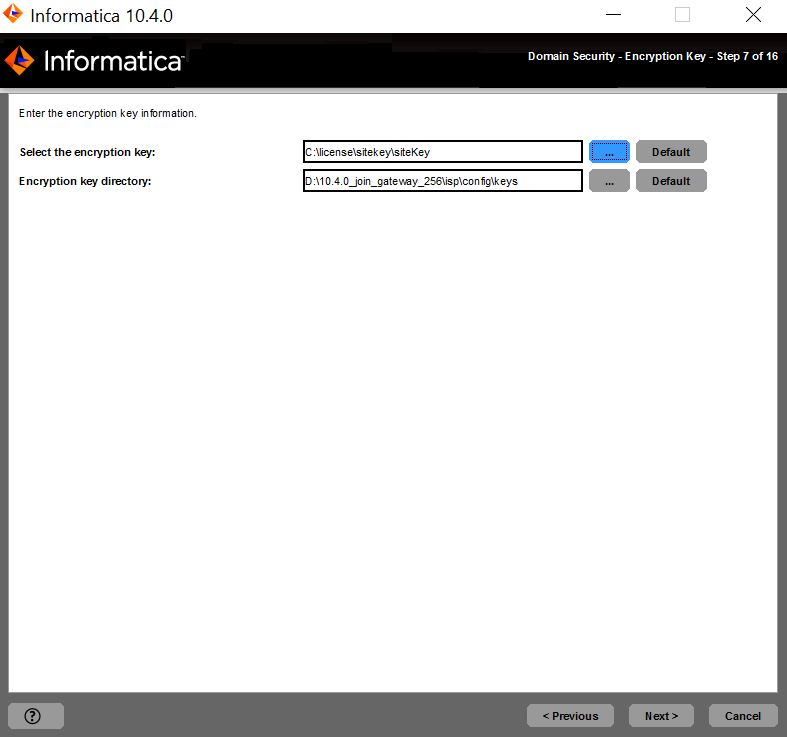
    Domain Security - Encryption Key
    page appears.
    This image describes about the domain security encryption key.
  31. Enter the encryption key information for the Informatica domain that you want to join.
    The following table describes the encryption key parameters that you must specify when you join a domain:
    Property
    Description
    Select the encryption key
    Path and file name of the encryption key for the Informatica domain that you want to join. All nodes in the Informatica domain use the same encryption key. You must specify the encryption key file created on the gateway node for the domain that you want to join.
    If you copied the encryption key file to a temporary directory to make it accessible to the nodes in the domain, specify the path and file name of the encryption key file in the temporary directory.
    Encryption key directory
    Directory in which to store the encryption key on the node created during this installation. The installer copies the encryption key file for the domain to the encryption key directory on the new node. By default, the encryption key is created in the following directory:
    <Informatica installation directory>/isp/config/keys
    .
  32. Click
    Next
    .
    The
    Join Domain Node Configuration
    page appears.
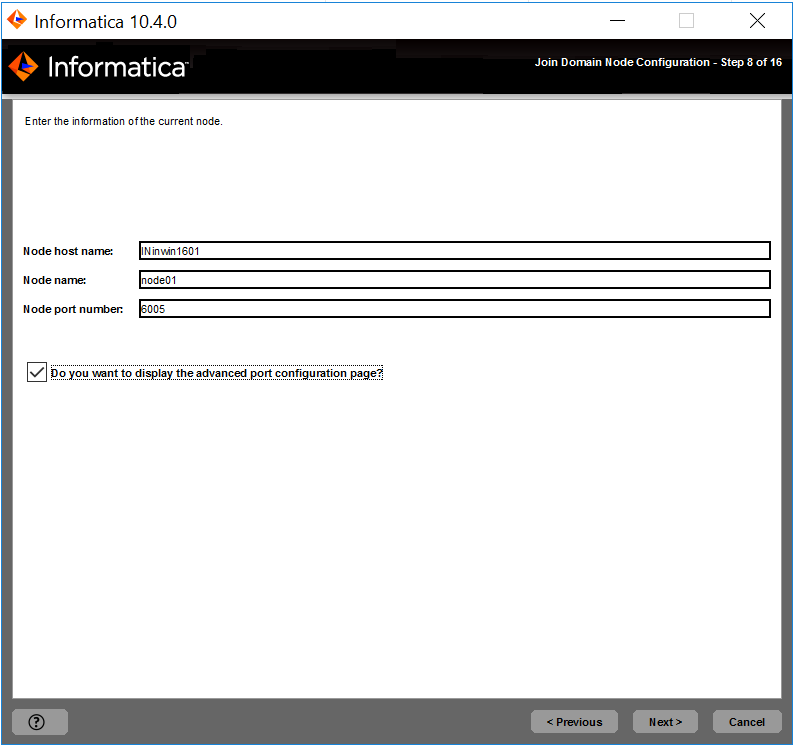
    This image describes about the information you can enter for the node configuration.
  33. Enter the information for the node you want to create.
    The following table describes the properties that you set for the node:
    Property
    Description
    Node Host name
    Host name for the node. The node host name cannot contain the underscore (_) character.
    Do not use localhost. The host name must explicitly identify the machine.
    Node name
    Name of the Informatica node to create on this machine. The node name is not the host name for the machine.
    Node port number
    Port number for the node.
    Database truststore file
    Path and file name of the truststore file for the secure database. Select the same database truststore file used by the master gateway node in the domain.
    Required if you join a gateway node to a domain that uses a secure domain configuration repository database.
    Truststore password
    Password for the database truststore file for the secure database.
    Required if you join a gateway node to a domain that uses a secure domain configuration repository database.
  34. To display the default ports for the domain and node components assigned by the installer, select
    Display advanced port configuration page
    .
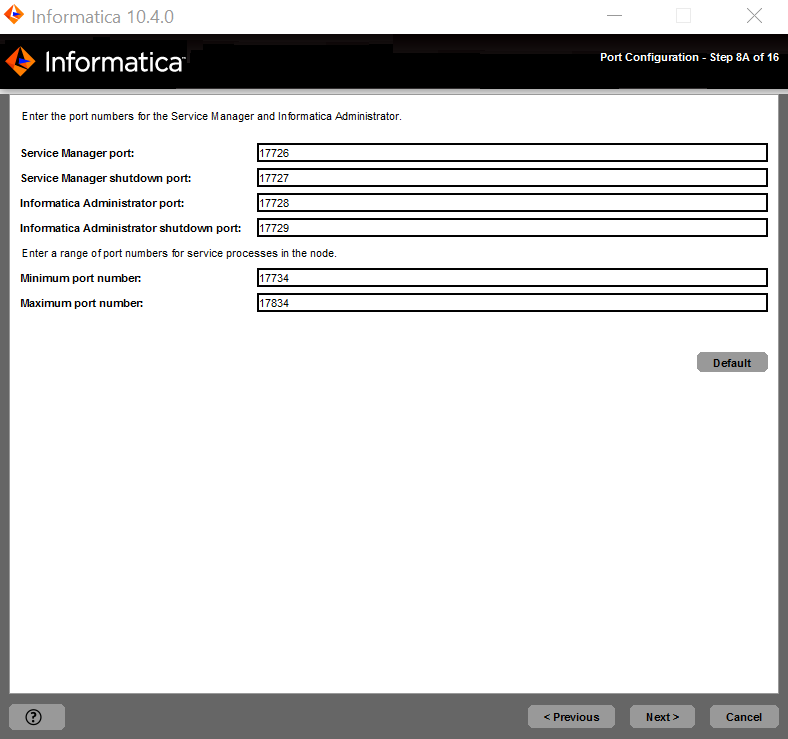
    If you display the port configuration page, the installer displays the default port numbers assigned to the domain and node. You can modify the port numbers or specify a different range of port numbers for the application service processes. If you do not select the display the port configuration page, the installer does not display the default port numbers and you cannot modify the assigned port numbers.
  35. Click
    Next
    .
    If you selected to display the port configuration page, the installer displays the
    Port Configuration
    page.
    If you did not select to display the port configuration page, the installer displays the
    Windows Service Configuration
    page. Skip to step 38 .
  36. On the
    Port Configuration
    page, enter the port numbers to use for the domain service manager and service processes that will run on the node.
    Verify that the port numbers you enter are not used by other applications.
    The following table describes the ports that you can set:
    Port
    Description
    Service Manager port
    Port number used by the Service Manager on the node. The Service Manager listens for incoming connection requests on this port. Client applications use this port to communicate with the services in the domain. The Informatica command line programs use this port to communicate to the domain. This is also the port for the SQL data service JDBC/ODBC driver. Default is 6006.
    Service Manager Shutdown port
    Port number that controls server shutdown for the domain Service Manager. The Service Manager listens for shutdown commands on this port. Default is 6007.
    Minimum port number
    Lowest port number in the range of dynamic port numbers that can be assigned to the application service processes that run on this node. Default is 6014.
    Maximum port number
    Highest port number in the range of dynamic port numbers that can be assigned to the application service processes that run on this node. Default is 6114.
  37. Click
    Next
    .
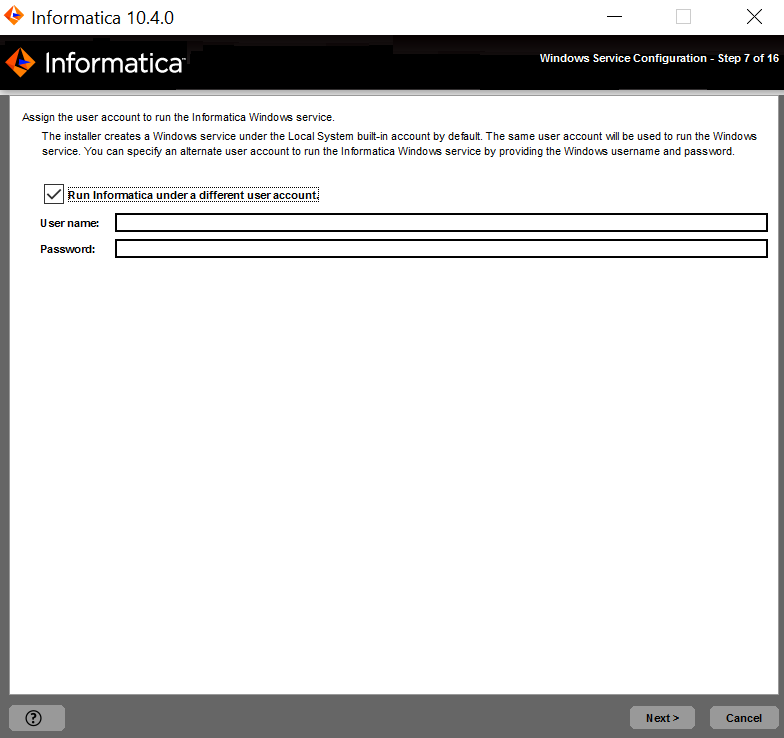
  38. On the
    Windows Service Configuration
    page, select whether to run the Windows service under a different user account.
    The installer creates a service to start Informatica. By default, the service runs under the same user account as the account used for installation. You can run the Windows service under a different user account.
    The following table describes the properties that you set to run Informatica under a different account:
    Property
    Description
    Run Informatica under a different user account
    Indicates whether to run the Windows service under a different user account.
    User name
    User account with which to run the Informatica Windows service.
    Use the following format:
    <domain name>\<user account>
    This user account must have the Act as operating system permission.
    Password
    Password for the user account with which to run the Informatica Windows service.
  39. Click
    Next
    .
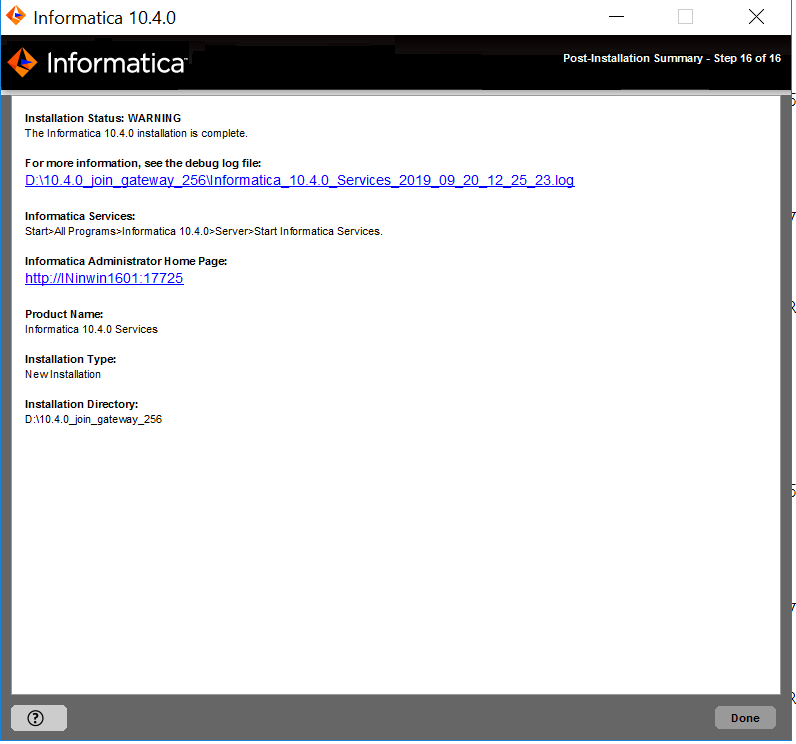
    The
    Post-Installation Summary
    page indicates whether the installation completed successfully. The summary also shows the status of the installed components and their configuration.
  40. Click
    Done
    to close the installer.
You can view the files to get more information about the tasks performed by the installer and to view configuration properties for the installed components.

0 COMMENTS

We’d like to hear from you!