Table of Contents

Search

  1. Preface
  2. Introduction to PowerExchange for Snowflake
  3. PowerExchange for Snowflake Configuration
  4. Snowflake Sources and Targets
  5. Snowflake Mappings
  6. Snowflake Sessions
  7. Snowflake Pushdown Optimization
  8. Appendix A: Snowflake Data Type Reference

PowerExchange for Snowflake User Guide for PowerCenter

PowerExchange for Snowflake User Guide for PowerCenter

Configuring the Snowflake ODBC Driver on Windows

Configuring the Snowflake ODBC Driver on Windows

To establish an ODBC connection to connect to Snowflake on Windows, install the 64-bit Snowflake ODBC driver on the machine where the PowerCenter Integration Server runs and 32-bit ODBC driver on the machine where you install the PowerCenter Client.
After you install the driver, configure the Data Source Name (DSN) in the ODBC Data Source Administrator.
  1. Download the 64-bit and 32-bit Snowflake ODBC drivers from the Snowflake web interface in your Snowflake account.
  2. Install the 64-bit Snowflake ODBC driver on the machine that hosts the PowerCenter Integration Service and the 32-bit ODBC driver on the machine where you install the PowerCenter Client.
  3. Open the following directory where you installed the ODBC data source file:
    • For 32-bit driver:
      C:\WINDOWS\syswow64
    • For 64-bit driver:
      C:\WINDOWS\system32
  4. Run the
    odbcad32.exe
    file.
    The
    ODBC Data Sources Administrator
    box appears.
  5. Click
    System DSN
    .
    The
    System DSN
    tab appears.
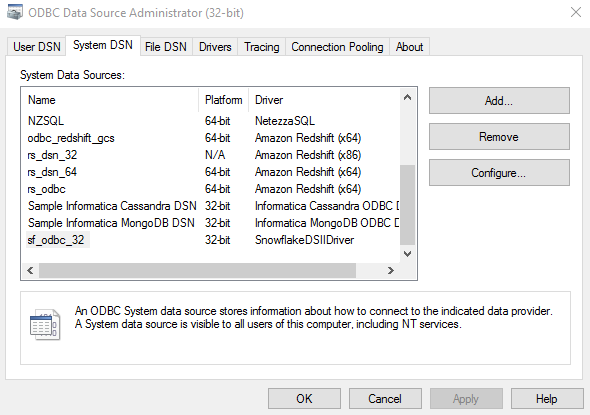
    The following image shows the
    System DSN
    tab on the
    ODBC Data Source Administrator
    box:
    You can view the System DSN tab where you add the data source.
  6. Click
    Add
    .
    The
    Create New Data Source
    dialog appears.
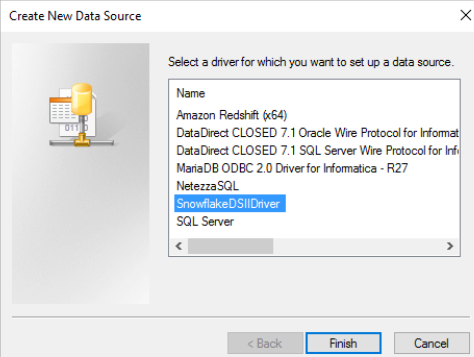
    The following image shows the Create New Data Source dialog box where you can select the Snowflake data source:
    You can view the Create New Data Source dialog where you can select the driver.
  7. Select the
    SnowflakeDSIIDriver
    and click
    Finish
    .
  8. Click
    Configure
    .
    The
    Snowflake ODBC Driver DSN Setup
    box appears.
  9. Specify the following connection properties in the
    Connection Settings
    section:
    Property
    Description
    Data Source
    Name of the data source.
    User
    User name to access the Snowflake database.
    Password
    Password to access the Snowflake database.
    Server
    Domain name of your Snowflake account.
    Database
    Name of the Snowflake database.
    Schema
    Name of the Snowflake schema.
    Warehouse
    Name of the Snowflake warehouse.
    Role
    The Snowflake role assigned to user.
    Tracing (0-6)
    Determines the amount of detail that appears in the log file.
    • 0. Disable tracing.
    • 1. Fatal error tracing.
    • 2. Error tracing.
    • 3. Warning tracing.
    • 4. Info tracing.
    • 5. Debug tracing.
    • 6. Detailed tracing.
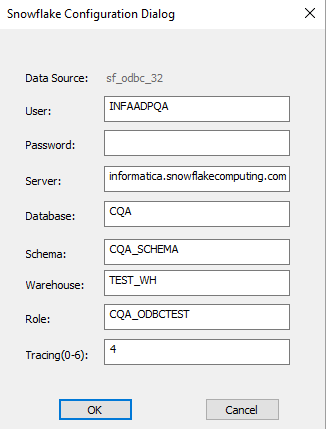
    The following image shows the
    Snowflake ODBC Driver DSN Setup
    box where you can configure the connection settings:
    Configure the connection settings in the Snowflake ODBC Driver DSN Setup.
  10. Click
    OK
    .
    The Snowflake ODBC connection is configured successfully on Windows.

0 COMMENTS

We’d like to hear from you!