Table of Contents

Search

  1. Preface
  2. Part 1: Getting Started with PowerExchange for SAP NetWeaver
  3. Part 2: Data Integration Using PowerExchange for SAP Dynamic ABAP Table Extractor
  4. Part 3: Data Integration Using ABAP
  5. Part 4: IDoc Integration Using ALE
  6. Part 5: Data Integration Using BAPI/RFC Functions
  7. Part 6: Data Migration
  8. Part 7: Business Content Integration
  9. Part 8: SAP BW Data Extraction
  10. Part 9: Loading Data to SAP BI
  11. Appendix A: Data Type Reference
  12. Appendix B: Code Pages and Unicode Support
  13. Appendix C: Glossary

PowerExchange for SAP NetWeaver User Guide for PowerCenter

PowerExchange for SAP NetWeaver User Guide for PowerCenter

Import SAP Dynamic ABAP Table Extraction Source Definitions

Import SAP Dynamic ABAP Table Extraction Source Definitions

You must import SAP Dynamic ABAP Table Extraction source objects before you create a mapping.
Use the
Create from SAPTableReader
wizard to import SAP Dynamic ABAP Table Extraction source definitions into the PowerCenter repository.
  1. Start PowerCenter Designer and connect to a PowerCenter repository.
  2. Open a source folder.
  3. Click
    Tools
    Source Analyzer
    .
  4. In the Source Analyzer, click
    Sources
    Create SAPTableReader Source
    .
    The
    SAP Connection
    dialog box appears as shown in the following image:
    The SAP Connection dialog box shows the connection details.
  5. Configure the following connection parameters:
    Property
    Description
    Username
    Required. User name for the SAP source system that you want to access.
    Password
    Required. Password for the user name.
    Connection type
    Required. Type of connection that you want to create.
    Select one of the following values:
    • Application. Create an application connection when you want to connect to a specific SAP application server.
    • Load balancing. Create a load balancing connection when you want to use SAP load balancing.
    Default is Application.
    Based on the connection type you select, the corresponding connection property fields become available in the
    Connection Details
    dialog box. The PowerCenter tool greys out the connection property fields that are not applicable for a particular connection type.
    Host name
    Required when you create an SAP application connection.
    Host name or IP address of the SAP server that you want to connect to.
    System number
    Required when you create an SAP application connection.
    SAP system number.
    Message host name
    Required when you create an SAP load balancing connection.
    Host name of the SAP message server.
    R3 name/SysID
    Required when you create an SAP load balancing connection.
    Name of the SAP system.
    Group
    Required when you create an SAP load balancing connection.
    Group name of the SAP application server.
    Client
    Required. SAP client number.
    Language
    Optional. Language that you want to use for mappings and workflows.
    Must be compatible with the PowerCenter tool code page.
    If you leave this option blank, the PowerCenter tool uses the default language of the SAP system.
    Trace
    Optional. Use this option to track the JCo calls that the SAP system makes. SAP stores the information about the JCo calls in a trace file.
    Specify one of the following values:
    • 0. Off
    • 1. Full
    Default is 0.
    You can access the trace files from the following directories:
    • <Informatica installation directory>/tomcat/bin
      directory on the machine where you installed the Informatica services
    • <Informatica installation directory>/clients/PowerCenterClient
      directory on the machine where you installed the PowerCenter tool.
    Additional parameters
    Optional. Enter any other connection parameter that you want to use.
    Use the following format:
    <parameter name>=<value>
  6. Click
    Next
    . Do not enter connection details in the
    Staging details
    page because PowerExchange for SAP Dynamic ABAP Table Extractor does not support staging mode.
  7. Click
    Next
    . Do not enter connection details in the
    FTP/SFTP details
    page because PowerExchange for SAP Dynamic ABAP Table Extractor does not support FTP/SFTP mode.
  8. Click
    Next
    .
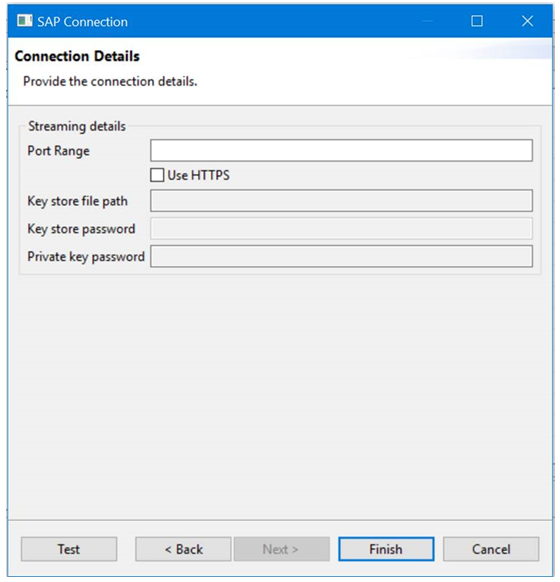
    The
    Streaming details
    page appears as shown in the following image:
    The SAP Connection dialog box shows the Streaming details page.
  9. Configure the following connection parameters:
    Property
    Description
    Port range
    HTTP port range that the PowerCenter Integration Service must use to read data from the SAP server in streaming mode.
    Enter the minimum and maximum port numbers with a hyphen as the separator. The minimum and maximum port number can range between 10000 and 65535. You can also specify the port range according to your organization.
    Default is 10000-65535.
    Use HTTPS
    Select this option to enable HTTPS streaming when you read data from SAP tables.
    By default, the
    Use HTTPS
    check box is not selected.
    For more information about configuring HTTPS for table reader mappings in streaming mode, see the article "HTTPS Configuration for Table Reader Mappings with PowerExchange for SAP Dynamic ABAP Table Extractor" on the Informatica Documentation Portal.
    Key store file path
    Path to the keystore file that contains the private or public key pairs and the associated certificates.
    Key store password
    Password for the keystore file.
    Private key password
    Password to decrypt the private key file.
  10. Click
    Test
    to test the connection.
  11. Click
    Finish
    .
    The
    CreateSAPTableReader Source
    page appears.
  12. You can select SAP tables or ABAP CDS views.
    The following image shows an SAP table selected and its column metadata:
    The image shows an SAP table with its column metadata.
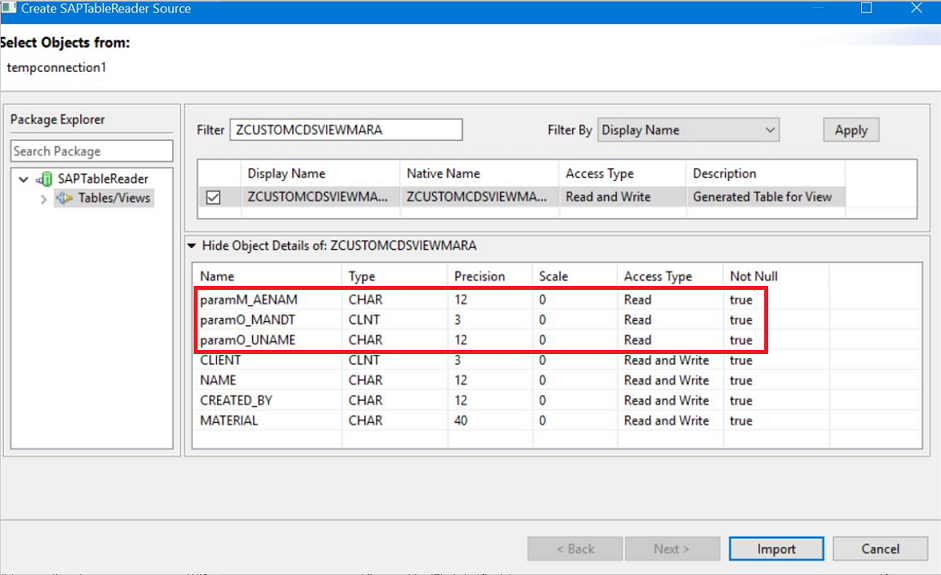
    The following image shows an ABAP CDS view selected and its column metadata:
    The image shows an ABAP CDS view selected and its column metadata.
    In the above example,
    paramO
    denotes an optional parameter.
    paramM
    denotes a mandatory parameter. For more information on parameters, see Parameters
  13. Select the table or view that you want to import, and then click
    Import
    .
    The table or view is imported and you can add it to a mapping.

0 COMMENTS

We’d like to hear from you!