Table des matières

Search

  1. Installation : mise en route
  2. Avant l'installation des services
  3. Exécuter le programme d'installation des services
  4. Après l'installation des services
  5. Installation du client Informatica
  6. Désinstallation
  7. Démarrage et arrêt des services Informatica
  8. Connexion à des bases de données sous UNIX ou Linux
  9. Connexion aux bases de données sous Windows
  10. Mise à jour du paramètre DynamicSections d'une base de données DB2

Installation pour PowerCenter

Installation pour PowerCenter

Creating a Domain

Creating a Domain

Create a domain if you are installing for the first time or if you want to administer nodes in separate domains.
  1. Log in to the machine with a system user account.
  2. Close all other applications.
  3. Go to the root of the directory for the installation files and run install.bat as administrator.
    To run the file as administrator, right-click the install.bat file and select
    Run as administrator
    .
    If you do not run the installer as administrator, the Windows system administrator might encounter issues when accessing files in the Informatica installation directory.
    The
    Informatica 10.4.0
    page appears.
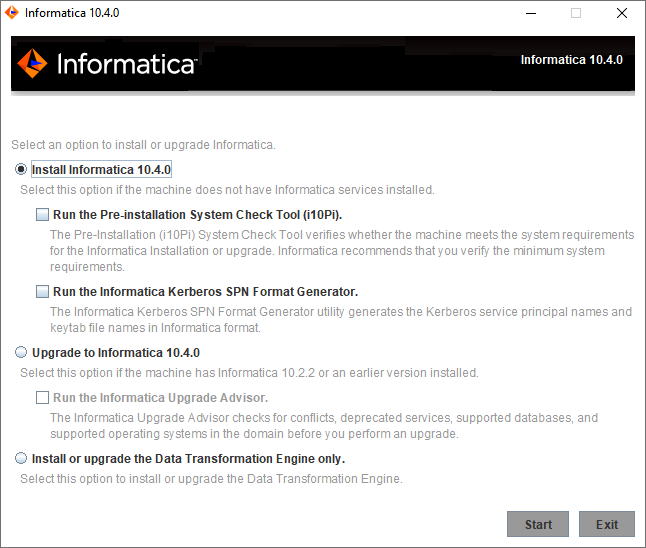
  4. Select
    Install Informatica 10.4.0
    .
    This image describes the options to install Informatica
    Informatica provides utilities to facilitate the Informatica services installation process. Run the following utilities before you install Informatica services:
    • Outil Pre-Installation System Check (i10Pi). Vérifie si la machine sur laquelle vous installez les services Informatica correspond à la configuration système requise pour l'installation.
      For more information about running the Pre-Installation (i10Pi) System Check Tool, see Exécuter l'outil Pre-Installation System Check (i10Pi) en mode graphique.
    • Informatica Kerberos SPN Format Generator. Crée une liste des noms de principaux Kerberos et des noms de fichiers Keytab requis pour exécuter les services Informatica sur un réseau avec authentification Kerberos.
    Vous pouvez utiliser le programme d'installation pour exécuter les utilitaires avant d'installer les services Informatica. Après avoir exécuté un utilitaire, redémarrez le programme d'installation pour exécuter l'utilitaire suivant ou installer les services Informatica.
  5. Click
    Start
    .
  6. Read the terms and conditions for Informatica installation and the product usage toolkit and select
    I agree to the terms and conditions
    .
    Informatica DiscoveryIQ est un outil d'utilisation du produit qui envoie des rapports de routine sur l'utilisation des données et les statistiques système à Informatica. Informatica DiscoveryIQ charge les données vers Informatica 15 minutes après l'installation et la configuration du domaine Informatica. Ensuite, le domaine envoie des données tous les 30 jours. Vous pouvez choisir de désactiver les statistiques d'utilisation à partir de l'outil Administrator tool.
  7. Click
    Next
    .
    The
    Installation Prerequisites
    page displays the installation requirements. Verify that all requirements are met before you continue the installation.
  8. Click
    Next
    .
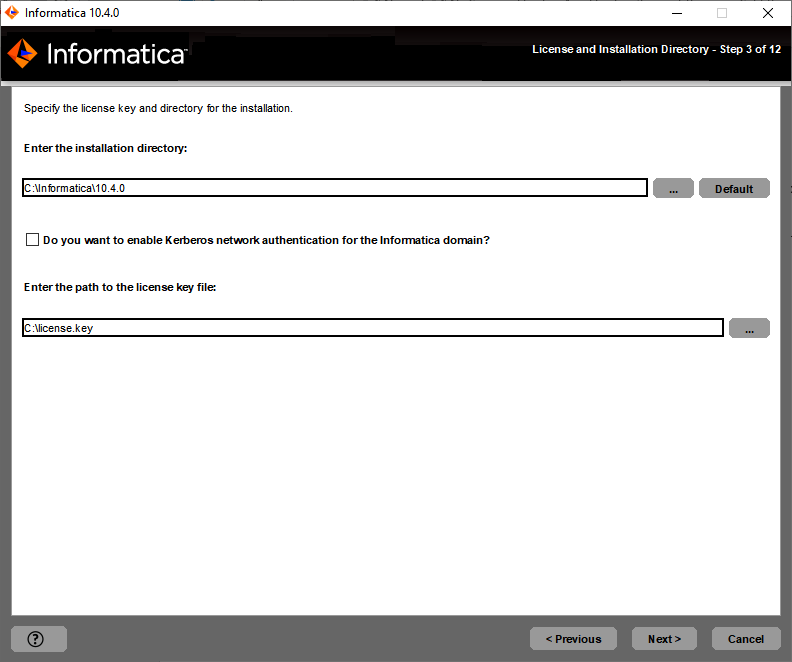
    The
    License and Installation Directory
    page appears.
    This image descibes about the license key, installation directory, and enabling kerberos network for the Informatica domain.
  9. Enter the Informatica license key and the installation directory.
    The following table describes the license key and directory that you specify for the informatica services installation:
    Property
    Description
    License key file
    Path and file name of the Informatica license key.
    Installation directory
    Absolute path for the installation directory. The installation directory must be on the machine where you are installing Informatica. The directory names in the path must not contain spaces or the following special characters:
    @ | * $ # ! % ( ) { } [ ]
    Informatica recommends using alphanumeric characters in the installation directory path. If you use a special character such as á or €, unexpected results might occur at run time.
  10. To configure the Informatica domain to run on a network with Kerberos authentication, select
    Enable Kerberos Network Authentication
    .
  11. Click
    Next
    .
    If you enabled Kerberos network authentication, the
    Network Security - Service Principal Level
    page appears.
    This image describes the network security information.
    If you do not enable Kerberos network authentication, the
    Pre-Installation Summary
    page appears. Skip to 16
  12. On the
    Network Security - Service Principal Level
    page, select the level at which to set the Kerberos service principals for the domain.
    The following table describes the service principal levels that you can select:
    Niveau
    Description
    Niveau processus
    Configure le domaine pour utiliser un nom de principal de service (SPN) et un fichier Keytab uniques pour chaque nœud et chaque service d'application sur un nœud.
    Le nombre de SPN et de fichiers Keytab requis pour chaque nœud dépend du nombre de processus de service d'application exécutés sur le nœud. Utilisez l'option de niveau de processus pour les domaines qui nécessitent un niveau élevé de sécurité, comme par exemple les domaines de production.
    Niveau nœud
    Configure le domaine pour partager les SPN et les fichiers keytab sur un nœud.
    Cette option nécessite un SPN et un fichier Keytab pour le nœud et tous les services d'application exécutés sur le nœud. Elle requiert également un autre SPN et un autre fichier keytab pour tous les processus HTTP s'exécutant sur le nœud.
    Utilisez l'option de niveau de nœud pour les domaines qui n'ont pas besoin d'un niveau élevé de sécurité, tels que les domaines de test et de développement.
  13. Click
    Next
    .
    The
    Network Security - Kerberos Authentication
    page appears.
    This image describes about the network security kerberos authentication parameters.
  14. Enter the domain and keytab information required for Kerberos authentication.
    The following table describes the Informatica domain and node information that you must provide:
    Property
    Description
    Domain name
    Name of the domain to create.
    The name must not exceed 128 characters and must be 7-bit ASCII only. The name cannot contain a space or any of the following characters:
    ` % * + ; " ? , < > \ /
    Node name
    Name of the node to create.
    Node host name
    Fully qualified host name or IP address of the machine on which to create the node.
    The node host name cannot contain the underscore (_) character. Do not use localhost. The host name must explicitly identify the machine.
    The following table describes the Kerberos realm and keytab information that you must provide:
    Property
    Description
    Service realm name
    Name of the Kerberos realm that the domain uses to authenticate users. The realm name must be in uppercase and is case-sensitive.
    To configure Kerberos cross realm authentication, specify the name of each Kerberos realm that the domain uses to authenticate users, separated by a comma. For example:
    COMPANY.COM,EAST.COMPANY.COM,WEST.COMPANY.COM
    Use an asterisk as a wildcard character before a realm name to include all realms that include the name. For example:
    *EAST.COMPANY.COM
    User realm name
    Name of the Kerberos realm that the domain uses to authenticate users. The realm name must be in uppercase and is case-sensitive.
    To configure Kerberos cross realm authentication, specify the name of each Kerberos realm that the domain uses to authenticate users, separated by a comma. For example:
    COMPANY.COM,EAST.COMPANY.COM,WEST.COMPANY.COM
    Use an asterisk as a wildcard character before a realm name to include all realms that include the name. For example:
    *EAST.COMPANY.COM
    Keytab directory
    Directory where all keytab files for the Informatica domain are stored. The name of a keytab file in the Informatica domain must follow a format set by Informatica.
    Kerberos configuration file
    Path and file name of the Kerberos configuration file. Informatica requires the following name for the Kerberos configuration file:
    krb5.conf
    Si vous configurez le domaine afin qu'il s'exécute avec l'authentification Kerberos, le nom de domaine, le nom de nœud et le nom d'hôte du nœud doivent correspondre aux noms spécifiés lorsque vous avez exécuté Informatica Kerberos SPN Format Generator pour générer les SPN et les noms de fichiers Keytab. Si vous utilisez un autre domaine, nœud ou nom d'hôte, générez à nouveau les noms de fichier SPN et Keytab, et demandez à l'administrateur Kerberos d'ajouter le nouvel SPN à la base de données de noms de principal Kerberos et de créer les fichiers Keytab.
  15. Click
    Next
    .
    The
    Pre-Installation Summary
    page appears .
  16. Review the installation information, and click
    Install
    to continue.
    The installer copies the Informatica files to the installation directory. After the installer copies the files, the
    Domain Selection
    page appears.
    This image describes about creating a domain or join a domain on a node.
  17. Select
    Create a domain
    .
    Lorsque vous créez un domaine, le nœud que vous créez devient un nœud de passerelle dans le domaine. Le nœud de passerelle contient un gestionnaire de service qui gère toutes les opérations du domaine.
  18. To set up secure communication between services in the domain, select
    Enable secure communication for the domain
    .
    Par défaut, si vous activez la communication sécurisée pour le domaine, le programme d'installation configure une connexion HTTPS pour Informatica Administrator. Vous pouvez également créer un référentiel de configuration du domaine sur une base de données sécurisée.
  19. To secure the connection to Informatica Administrator, select
    Enable HTTPS for Informatica Administrator
    .
    The following table describes the properties that you set for a secure connection to the Administrator tool:
    Property
    Description
    Enable HTTPS for Informatica Administrator
    Select this option to secure the connection to Informatica Administrator. To use an unsecure HTTP connection, clear the option.
    By default, if secure communication is enabled for the domain, the installer enables this option. You can also enable this option even if you do not enable secure communication for the domain.
    Port
    The port to use for communication between Informatica Administrator and the Service Manager.
    Use a keystore file generated by the installer
    Use a self-signed keystore file generated by the installer. The installer creates a keystore file named Default.keystore in the following location:
    <Informatica installation directory>\tomcat\conf\
    Specify a keystore file and password
    Use a keystore file that you create. You can use a keystore file with a self-signed certificate or a certificate signed by a certification authority.
    Keystore password
    A plain-text password for the keystore file. Required if you use a keystore file that you create.
    Keystore file
    Path and file name of the keystore file. Required if you use a keystore file that you create.
  20. To configure Security Assertion Markup Language (SAML)-based single sign-on (SSO) support for web-based Informatica applications in an Informatica domain,
    Enable SAML authentication
    .
    If you enabled Kerberos network authentication, you cannot configure SAML authentication.
  21. Click
    Next
    .
    If you selected the
    Enable SAML authentication
    option, the
    SAML Authentication
    page appears.
    This image describes about SAML authentication that you can enter to configure the single sign on support for Informatica web application.
  22. Enter the Identity Provider URL for the domain.
  23. Enter the identity provider assertion signing certificate alias name.
  24. Specify whether to use the default Informatica SSL certificates or to use your SSL certificates to enable secure communication in the domain.
    The following table describes the SSL certificate options for SAML authentication:
    Option
    Description
    Use the default Informatica SSL certificate file.
    Select to use the default Informatica truststore file for SAML authentication.
    Enter the location of the SSL certificate file.
    Select to use a custom truststore file for SAML authentication. Specify the directory containing the custom truststore file on gateway nodes within the domain. Specify the directory only, not the full path to the file.
  25. If you provide the security certificates, specify the location and passwords of the keystore and truststore files.
    The following table describes the location and password of the truststore file:
    Property
    Description
    Truststore Directory
    Specify the directory containing the custom truststore file on gateway nodes within the domain. Specify the directory only, not the full path to the file.
    Truststore Password
    The password for the custom truststore file.
  26. Click
    Next
    .
    If you selected the
    Enable secure communication for the domain
    option, the
    Domain Security - Secure Communication
    page appears.
    This image describes about selecting the security certificates to secure the domain
    If you did not enable secure communication for the domain, the
    Domain Configuration Repository
    page appears. Skip to step 30.
  27. On the
    Domain Security - Secure Communication
    page, specify whether to use the default Informatica SSL certificates or to use your SSL certificates to enable secure communication in the domain.
    The following table describes the SSL certificate options for securing the Informatica domain:
    Option
    Description
    Use the default Informatica SSL certificate files
    Use the default SSL certificates provided by Informatica.
    If you do not provide an SSL certificate, Informatica uses the same default private key for all Informatica installations. If you use the default Informatica keystore and truststore files, the security of your domain could be compromised. To ensure a high level of security for the domain, select the option to specify the location of the SSL certificate files.
    Specify the location of the SSL certificate files
    Use SSL certificates that you provide. You must specify the location of the keystore and truststore files.
    You can provide a self-signed certificate or a certificate issued by a certificate authority (CA). You must provide SSL certificates in PEM format and in Java Keystore (JKS) files. Informatica requires specific names for the SSL certificate files for the Informatica domain. You must use the same SSL certificates for all nodes in the domain. Store the truststore and keystore files in a directory accessible to all the nodes in the domain and specify the same keystore file directory and truststore file directory for all nodes in the same domain.
  28. If you provide the security certificates, specify the location and passwords of the keystore and truststore files.
    The following table describes the parameters that you must enter for the SSL certificate files:
    Property
    Description
    Keystore file directory
    Directory that contains the keystore files. The directory must contain files named infa_keystore.jks and infa_keystore.pem.
    Keystore password
    Password for the keystore infa_keystore.jks.
    Truststore file directory
    Directory that contains the truststore files. The directory must contain files named infa_truststore.jks and infa_truststore.pem.
    Truststore password
    Password for the infa_truststore.jks file.
  29. Click
    Next
    .
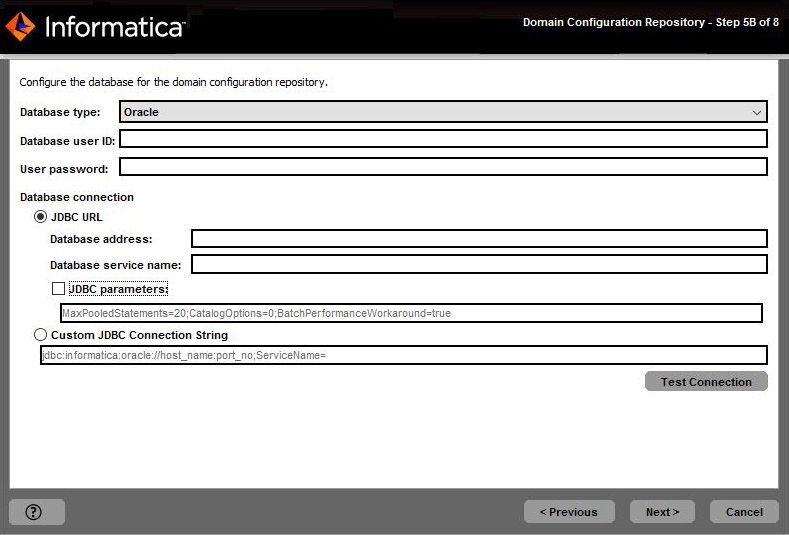
    The
    Domain Configuration Repository
    page appears.
    This image describes about configuring the database for the domain configuration repository.
  30. On the
    Domain Configuration Repository
    page, enter the database and user account information for the domain configuration repository.
    Le référentiel de configuration du domaine stocke les métadonnées pour les opérations de domaine et l'authentification de l'utilisateur. La base de données doit être accessible à tous les nœuds de passerelle du domaine.
    The following table describes the properties that you specify for the database and user account:
    Property
    Description
    Database type
    Database for the repository. Select one of the following databases:
    • Oracle
    • IBM DB2
    • Microsoft SQL Server
    • PostgreSQL
    • Sybase ASE
    Database user ID
    User account for the repository database.
    User password
    Password for the database user account.
    If you select IBM DB2, specify the tablespace for the repository tables:
    Property
    Description
    Tablespace
    Name of the tablespace in which to create the tables. Specify a tablespace that meets the pageSize requirement of 32768 bytes.
    In a single partition database, if this option is not selected, the installer creates the tables in the default tablespace.
    In a multipartition database, select this option and specify the name of the tablespace that resides in the catalog partition of the database.
    If you select Microsoft SQL Server or PostgreSQL, specify the schema for the repository tables and database connection:
    Property
    Description
    Schema name
    Name of the schema that will contain the repository tables. If not selected, the installer creates the tables in the default schema.
    Trusted connection
    Indicates whether to connect to Microsoft SQL Server through a trusted connection. Trusted authentication uses the security credentials of the current user to make the connection to Microsoft SQL Server. If not selected, the installer uses Microsoft SQL Server authentication.
    If you enabled secure communication for the domain, you can create the domain configuration repository in a database secured with the SSL protocol. To create a secure domain configuration repository, select
    Secure Database
    and skip to step 32.
    Vous ne pouvez pas configurer une connexion sécurisée à une base de données Sybase.
  31. Enter the database connection information.
    If you do not create a secure domain configuration repository, you can specify the connection properties for the JDBC URL or provide the JDBC connection string.
    • To enter the connection information using the JDBC URL, select
      JDBC URL
      and specify the database connection properties.
      The following table describes the JDBC URL properties that you specify:
      Property
      Description
      Database address
      Host name and port number for the database in the format
      host_name:port
      .
      Database service name
      Service or database name :
      • Oracle: Enter the service name.
      • Microsoft SQL Server: Enter the database name.
      • IBM DB2: Enter the service name.
      • Sybase ASE: Enter the database name.
      • PostgreSQL: Enter the database name.
      JDBC parameters
      Optional parameters to include in the database connection string. Use the parameters to optimize database operations for the database. Verify that the parameter string is valid. The installer does not validate the parameter string before it adds the string to the JDBC URL. If not selected, the installer creates the JDBC URL string without additional parameters.
    • To enter the connection information using a custom JDBC connection string, select
      Custom JDBC connection string
      and type the connection string.
  32. If you selected the
    Secure database
    option to create a secure domain configuration repository, enter the connection information using a custom JDBC connection string.
    Si vous créez le référentiel sur une base de données sécurisée, vous devez fournir les informations truststore de la base de données. Vous devez aussi fournir une chaîne de connexion JDBC qui comprend les paramètres de sécurité de la base de données.
    The following table describes the properties you must set for a secure database:
    Property
    Description
    Database truststore file
    Path and file name of the truststore file for the secure database.
    Database truststore password
    Password for the truststore file.
    Custom JDBC Connection String
    JDBC connection string to connect to the secure database, including the host name and port number and the security parameters for the database.
    For information about the security parameters you must include in the JDBC connection for a secure database, see Chaîne de connexion à une base de données sécurisée.
  33. Click
    Test Connection
    to verify that you can connect to the database, and then click
    OK
    to continue.
  34. Click
    Next
    .
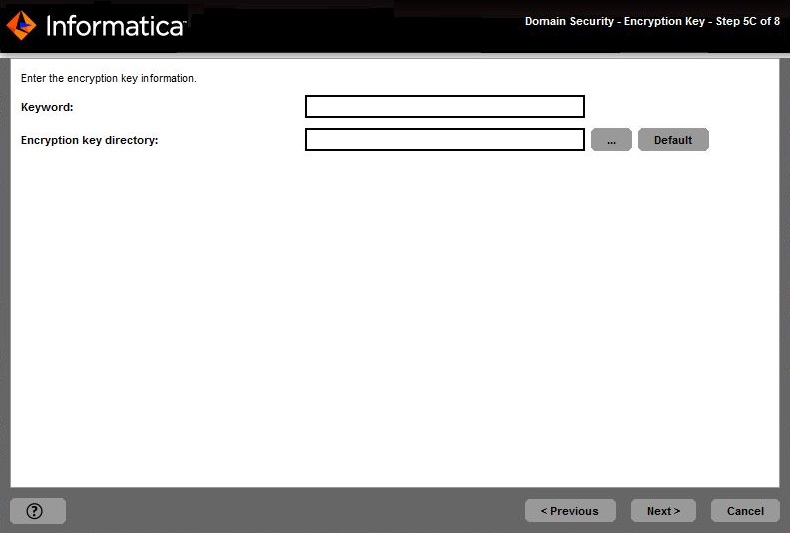
    The
    Domain Security - Encryption Key
    page appears.
    This image describes about the domain security encryption key.
  35. Enter the keyword and directory for the encryption key of the Informatica domain.
    The following table describes the encryption key parameters that you must specify:
    Property
    Description
    Keyword
    Keyword to use to create a custom encryption key to secure sensitive data in the domain. The keyword must meet the following criteria:
    • From 8 to 20 characters long
    • Includes at least one uppercase letter
    • Includes at least one lowercase letter
    • Includes at least one number
    • Does not contain spaces
    The encryption key is created based on the keyword that you provide when you create the Informatica domain.
    Encryption key directory
    Directory in which to store the encryption key for the domain. By default, the encryption key is created in the following directory:
    <Informatica installation directory>/isp/config/keys
    .
  36. Click
    Next
    .
    The
    Domain and Node Configuration
    page appears.
    This image describes the domain node configuration information.
  37. Enter the information for the domain and the node that you want to create.
    The following table describes the properties that you set for the domain and gateway node:
    Property
    Description
    Domain name
    Name of the Informatica domain to create. The default domain name is Domain_<MachineName>.
    The name must not exceed 128 characters and must be 7-bit ASCII only. The name cannot contain a space or any of the following characters:
    ` % * + ; " ? , < > \ /
    Node name
    Name of the node to create.
    Node host name
    Host name or IP address of the machine on which to create the node.
    If the machine has a single network name, use the default host name. If the a machine has multiple network names, you can modify the default host name to use an alternate network name.
    The node host name cannot contain the underscore (_) character. Do not use localhost. The host name must explicitly identify the machine.
    Node port number
    Port number for the node. The default port number for the node is 6005. If the port number is not available on the machine, the installer displays the next available port number.
    Domain user name
    User name for the domain administrator. You can use this user name to initially log in to Informatica Administrator. Use the following guidelines:
    • The name is not case sensitive and cannot exceed 128 characters.
    • The name cannot include a tab, newline character, or the following special characters: % * + / ? ; < >
    • The name can include an ASCII space character except for the first and last character. Other space characters are not allowed.
    Domain password
    Password for the domain administrator. The password must be more than 2 characters and must not exceed 16 characters.
    Not available if you configure the Informatica domain to run on a network with Kerberos authentication.
    Confirm password
    Enter the password again to confirm.
    Not available if you configure the Informatica domain to run on a network with Kerberos authentication.
  38. To display the default ports for the domain and node components assigned by the installer, enable
    Display advanced port configuration page
    .
    Si vous affichez la page de configuration des ports, le programme d'installation affiche les numéros de port par défaut attribués au domaine et au nœud. Vous pouvez modifier les numéros de port ou spécifier une plage de numéros de port différente pour les processus de service d'application. Si vous n'affichez pas la page de configuration des ports, le programme d'installation n'affiche pas les numéros de port par défaut et vous ne pouvez pas modifier les numéros de port attribués.
  39. To create a Model Repository Service and a Data Integration Service during the installation, enable
    Configure Model Repository Service and Data Integration Service
    .
    If you select to configure the services, the installer creates a Model Repository Service and a Data Integration Service in the new domain. You must specify the database for the Model repository and configure the connection to the Data Integration Service. By default, the installer starts the services when the installation completes.
    If you do not configure the services, the installer does not create a Model Repository Service or a Data Integration Service in the new domain. You can create the services in the Administrator tool after installation.
  40. Click
    Next
    .
    If you selected to display the port configuration page, the installer displays the
    Port Configuration
    page appears.
    This image describes about the port configuration information.
    If you did not select to display the port configuration page, the installer displays the
    Windows Service Configuration
    page. Skip to step 43.
  41. On the
    Port Configuration
    page, enter the port numbers to use for the domain service manager and service processes that will run on the node.
    Verify that the port numbers you enter are not used by other applications.
    The following table describes the ports that you can set:
    Port
    Description
    Service Manager port
    Port number used by the Service Manager on the node. The Service Manager listens for incoming connection requests on this port. Client applications use this port to communicate with the services in the domain. The Informatica command line programs use this port to communicate to the domain. This is also the port for the SQL data service JDBC/ODBC driver. Default is 6006.
    Service Manager Shutdown port
    Port number that controls server shutdown for the domain Service Manager. The Service Manager listens for shutdown commands on this port. Default is 6007.
    Informatica Administrator port
    Port number used by Informatica Administrator. Default is 6008.
    Informatica Administrator HTTPS port
    No default port. Enter the required port number when you create the service. Setting this port to 0 disables an HTTPS connection to the Administrator tool.
    Informatica Administrator shutdown port
    Port number that controls server shutdown for Informatica Administrator. Informatica Administrator listens for shutdown commands on this port. Default is 6009.
    Minimum port number
    Lowest port number in the range of dynamic port numbers that can be assigned to the application service processes that run on this node. Default is 6014.
    Maximum port number
    Highest port number in the range of dynamic port numbers that can be assigned to the application service processes that run on this node. Default is 6114.
  42. Click
    Next
    .
    The installer displays the
    Windows Service Configuration
    page.
    This image describes about the windows service configuration information.
  43. On the
    Windows Service Configuration
    page, select whether to run the Windows service under a different user account.
    Le programme d'installation crée un service pour exécuter Informatica. Par défaut, le service est exécuté sous le même compte d'utilisateur que celui utilisé pour l'installation. Vous pouvez exécuter le service Windows avec un compte d'utilisateur différent.
    The following table describes the properties that you set to run Informatica under a different account:
    Property
    Description
    Run Informatica under a different user account
    Indicates whether to run the Windows service under a different user account.
    User name
    User account with which to run the Informatica Windows service.
    Use the following format:
    <domain name>\<user account>
    This user account must have the Act as operating system permission.
    Password
    Password for the user account with which to run the Informatica Windows service.
  44. Click
    Next
    .
    If you selected to configure the Informatica application services, the installer displays the
    Model Repository Service Database
    page appears.
    The image describes about configuring the Model Repository database.
    If you did not select to create the services, the installer displays the
    Post-Installation Summary
    page. The
    Post-Installation Summary
    page indicates whether the installation completed successfully. Skip to step 53.
  45. On the
    Model Repository Service Database
    page, enter the database and user account information for the Model repository.
    The following table describes the properties that you specify for the database and user account:
    Property
    Description
    Database type
    Database for the repository. Select one of the following databases:
    • Oracle
    • IBM DB2
    • Microsoft SQL Server
    • PostgreSQL
    • Sybase ASE
    Database user ID
    User account for the repository database.
    User password
    Password for the database user account.
    If you select IBM DB2, specify the tablespace for the repository tables:
    Property
    Description
    Tablespace
    Name of the tablespace in which to create the tables. Specify a tablespace that meets the pageSize requirement of 32768 bytes.
    In a single partition database, if this option is not selected, the installer creates the tables in the default tablespace.
    In a multipartition database, select this option and specify the name of the tablespace that resides in the catalog partition of the database.
    If you select Microsoft SQL Server or PostgreSQL, specify the schema for the repository tables and database connection:
    Property
    Description
    Schema name
    Name of the schema that will contain the repository tables. If not selected, the installer creates the tables in the default schema.
    Trusted connection
    Indicates whether to connect to Microsoft SQL Server through a trusted connection. Trusted authentication uses the security credentials of the current user to make the connection to Microsoft SQL Server. If not selected, the installer uses Microsoft SQL Server authentication.
    If you enabled secure communication for the domain, you can create the Model repository in a database secured with the SSL protocol. To create a secure Model repository, skip to step 47.
  46. Enter the database connection information.
    If you do not create a secure Model repository, you can specify the connection properties for the JDBC URL or provide the JDBC connection string.
    • To enter the connection information using the JDBC URL, select
      JDBC URL
      and specify the database connection properties.
      The following table describes the JDBC URL properties that you specify:
      Property
      Description
      Database address
      Host name and port number for the database in the format
      host_name:port
      .
      Database service name
      Service or database name :
      • Oracle: Enter the service name.
      • Microsoft SQL Server: Enter the database name.
      • IBM DB2: Enter the service name.
      • Sybase ASE: Enter the database name.
      • PostgreSQL: Enter the database name.
      JDBC parameters
      Optional parameters to include in the database connection string. Use the parameters to optimize database operations for the database. Verify that the parameter string is valid. The installer does not validate the parameter string before it adds the string to the JDBC URL. If not selected, the installer creates the JDBC URL string without additional parameters.
    • To enter the connection information using a custom JDBC connection string, select
      Custom JDBC connection string
      and type the connection string.
      IBM DB2
      jdbc:Informatica:db2://<host name>:<port number>;DatabaseName=
      Oracle
      jdbc:Informatica:oracle://<host name>:<port number>;ServiceName=
      Microsoft SQL Server
      jdbc:Informatica:sqlserver://<host name>:<port number>;SelectMethod=cursor;DatabaseName=
      PostgreSQL
      jdbc:Informatica:postgresql://<host name>:<port number>;DatabaseName=
      Verify that the connection string contains all the connection parameters required by your database system.
  47. To create a secure Model repository, enable
    Secure database
    .
    Si vous créez le référentiel sur une base de données sécurisée, vous devez fournir les informations truststore de la base de données. Vous devez aussi fournir une chaîne de connexion JDBC qui comprend les paramètres de sécurité de la base de données.
    The following table describes the properties you must set for a secure database:
    Property
    Description
    Database truststore file
    Path and file name of the truststore file for the secure database.
    Database truststore password
    Password for the truststore file.
    Custom JDBC Connection String
    JDBC connection string to connect to the secure database, including the host name and port number and the security parameters for the database.
    For information about the security parameters you must include in the JDBC connection for a secure database, see Chaîne de connexion à une base de données sécurisée.
  48. Click
    Test Connection
    to verify that you can connect to the database, and then click
    OK
    to continue.
  49. Click
    Next
    .
    The
    Application Service Parameters
    page appears.
    The image describes about the paramters you must enter for the application services.
  50. On the
    Application Service Parameters
    page, enter the name of the Model Repository Service and configure the Data Integration Service properties.
    The following table describes services parameters that you must set:
    Port
    Description
    Model Repository Service name
    Name of the Model Repository Service to create in the Informatica domain.
    Data Integration Service name
    Name of the Data Integration Service to create in the Informatica domain.
    HTTP protocol type
    Type of connection to the Data Integration Service. Select one of the following options:
    • HTTP. Requests to the service uses an HTTP connection.
    • HTTPS. Requests to the service uses a secure HTTP connection.
    • HTTP&HTTPS. Requests to the service can use either an HTTP or HTTPS connection.
    HTTP port
    Port number to used for the Data Integration Service. Default is 6030.
  51. If you select an HTTPS connection, specify whether to use the default Informatica SSL certificates or to use your SSL certificates to secure the connection to the Data Integration Service.
    The following table describes the SSL certificate options for securing the Data Integration Service:
    Option
    Description
    Use the default Informatica SSL certificate files
    Use the default SSL certificates provided by Informatica.
    If you do not provide an SSL certificate, Informatica uses the same default private key for all Informatica installations. If you use the default Informatica keystore and truststore files, the security of your domain could be compromised. To ensure a high level of security for the domain, select the option to specify the location of the SSL certificate files.
    Enter the location of the SSL certificate files
    Use SSL certificates that you provide. You must specify the location of the keystore and truststore files.
    If you provide the certificate, specify the location and passwords of the keystore and truststore files.
    The following table describes the parameters that you must enter for the SSL certificate files:
    Property
    Description
    Keystore file
    Required. Path and file name of the keystore file that contains the private keys and SSL certificates for the database.
    Keystore password
    Required. Password for the keystore file for the secure database.
    Truststore file
    Required. Path and file name of the truststore file that contains the public key for the database.
    Truststore password
    Required. Password for the truststore file for the secure database.
  52. Click
    Next
    .
    The installer creates the Model Repository Service and Data Integration Service and starts the services.
    La page
    Récapitulatif de post-installation
    indique si l'installation a été effectuée. Le récapitulatif présente également le statut des composants installés ainsi que leur configuration.
  53. Click
    Done
    to close the installer.
Vous pouvez afficher les fichiers pour obtenir plus d'informations sur les tâches effectuées par le programme d'installation et pour afficher les propriétés de configuration des composants installés.