Reading a JSON File Using an Amazon S3 V2 Connector

Reading a JSON File Using an Amazon S3 V2 Connector

Creating an Amazon S3 V2 Mapping to Read a JSON File

Creating an Amazon S3 V2 Mapping to Read a JSON File

Add the Hierarchy Parser and Java transformations in an Amazon S3 mapping to read a JSON file.
  1. In
    Data Integration
    , click
    New
    Mappings
    Create
    .
    The
    New Mapping
    dialog box appears.
  2. Enter a name, location, and description for the mapping.
  3. On the Source transformation, specify a name and description in the general properties.
  4. On the
    Source
    tab, perform the following steps to provide the source details to read data from an Amazon S3 source:
    1. In the
      Connection
      field, select the
      Amazon S3 V2
      connection.
    2. In the
      Source Type
      field, select
      Single
      object.
    3. In the
      Object
      field, select the source object of the JSON file.
      By default, the format type of a JSON file is binary.
    4. In the
      Formatting Options
      field, set the value to
      None
      .
  5. Add a Java transformation.
  6. Click
    Java
    .
    The
    Java Editor
    tab appears.
  7. Click
    Inputs
    .
    The
    Inputs
    tab appears.
  8. Add the following code to import the required Java packages in the
    Import Packages
    section:
    import java.nio.charset.StandardCharsets;
  9. Add the following code to convert the data of binary format into string format in the
    On Input Row
    section:
    <variable_name>= new String(data, StandardCharsets.UTF_8); generateRow();
    For example,
    out_string= new String(data, StandardCharsets.UTF_8); generateRow();
  10. Click
    Outputs
    .
    The
    Outputs
    tab appears.
  11. Click
    + Create a New Field
    .
    The
    New Field
    dialog box appears.
  12. In the
    New Field
    dialog box, define the variable names that you added in the
    On Input Row
    section.
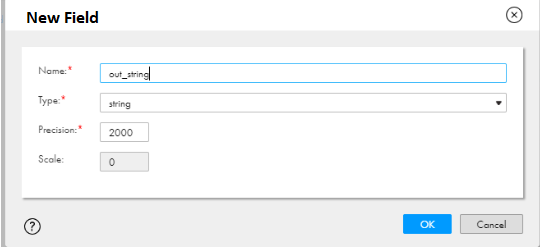
    For example, define the
    out_string
    variable name.
    The following image shows an example of the
    New Field
    dialog box:
  13. Click
    OK
    .
  14. In the
    Runtime Environment
    field, select the Secure Agent that you want to use and click
    Compile
    .
    The compilation successful message is displayed.
  15. Add a Hierarchy Parser transformation.
  16. Map the input ports from the Java transformation to the Hierarchy Parser transformation.
  17. Click on the Hierarchy Parser transformation.
  18. In the
    Incoming Fields
    tab, perform the following steps:
    1. Click the
      +
      add icon and select
      Delete Rule
      to delete any existing rules.
    2. Click the
      +
      add icon to add a new rule.
    3. Click
      Configure
      .
      The
      Configure Field Rules
      dialog box appears.
    4. In the
      Rule Details
      tab, select only the output strings.
      For example,
      out_string
      .
    5. Click
      OK
      .
  19. In the
    Input Settings
    tab, select the
    Input Type
    as
    Buffer
    and select an existing or create a new hierarchical schema.
  20. Map the input ports from the Java transformation to the Hierarchy Parser transformation.
  21. In the
    Input Field Selection
    tab, map the incoming fields to the hierarchical schema input fields.
  22. In the
    Field Mapping
    tab, expand the element name and click
    Map all descendants
    .
  23. Map the Hierarchy Parser transformation to the target.
    The
    Select Output Group
    dialog box appears.
  24. Select the required output group and click
    OK
    .
  25. Click
    Save
    Run
    to run the mapping.

0 COMMENTS

We’d like to hear from you!