Configuring a connection
Hi, I'm Ask INFA!
What would you like to know?
ASK INFAPreview
Please to access Ask INFA.

Data Integration Connections

Data Integration Connections

Configuring a connection

Configuring a connection

You can create a connection for connectors that are installed in
Informatica Intelligent Cloud Services
. You can create a connection on the
Connections
page in
Administrator
or when you create a source, target, or lookup object in a mapping or task in
Data Integration
.
When you configure a connection, you specify properties for the connection. Connection properties enable an agent to connect to data sources.
Some organizations that are configured to retrieve sensitive connection credentials from an external secrets manager can't create or edit connections in
Data Integration
. In these organizations, you need to create connections in
Administrator
. For more information about configuring connections in
Administrator
, see
Organization Administration
.
  1. Configure the following connection details:
    Property
    Description
    Connection Name
    Name of the connection.
    Each connection name must be unique within the organization. Connection names can contain alphanumeric characters, spaces, and the following special characters: _ . + -
    Maximum length is 100 characters. Connection names are not case sensitive.
    Description
    Description of the connection.
    Maximum length is 255 characters.
    Type
    Type of connection, such as Salesforce or Oracle.
  2. If your organization use an external secrets manager to store sensitive connection credentials, perform the following steps:
    1. In the Connection Properties area, select
      Use Secret Vault
      .
    2. Enable the option next to each property that you store in the secrets manager, and then enter the path, including the secret name, in the corresponding field. If the secret is a JSON object, you'll also need to include the secret key.
      The following table shows the value to enter based on the format of the secret:
      Format of secret
      Format of value to enter
      JSON object, for example:
      { "engine": "mysql", "username": "tsmith", "password": "Hello123", "host": "my-database-endpoint.us-west-2.rds.amazonaws.com", "dbname": "myDatabase", "port": "1234" }
      <secret_path>:<key>
      Alternatively, if you use AWS Secrets Manager, you can enter the full ARN of the secret in the following format*:
      arn:aws:secretsmanager:<region>:<account_ID>:secret:<secret_name>-<6_random_characters>:<secret_path>
      Simple value, for example:
      --name "MyPassword" --value "Hello123"
      <secret_path>
      Alternatively, if you use AWS Secrets Manager, you can enter the full ARN of the secret in the following format*:
      arn:aws:secretsmanager:<region>:<account_ID>:secret:<secret_name>-<6_random_characters>
      * If you use AWS Secrets Manager, and the account that hosts the Secure Agent differs from the account that hosts the secrets, you must enter the full ARN of the secret.
      For example, you configure a relational connection and you store the database password in HashiCorp Vault. The path to the secret is secret/data/MyCredentials, and the secret key is MyPassword. To retrieve the password from HashiCorp Vault, select
      Use Secret Vault
      , enable the option next to the
      Password
      field, and enter
      secret/data/MyCredentials:MyPassword
      in the
      Password
      field.
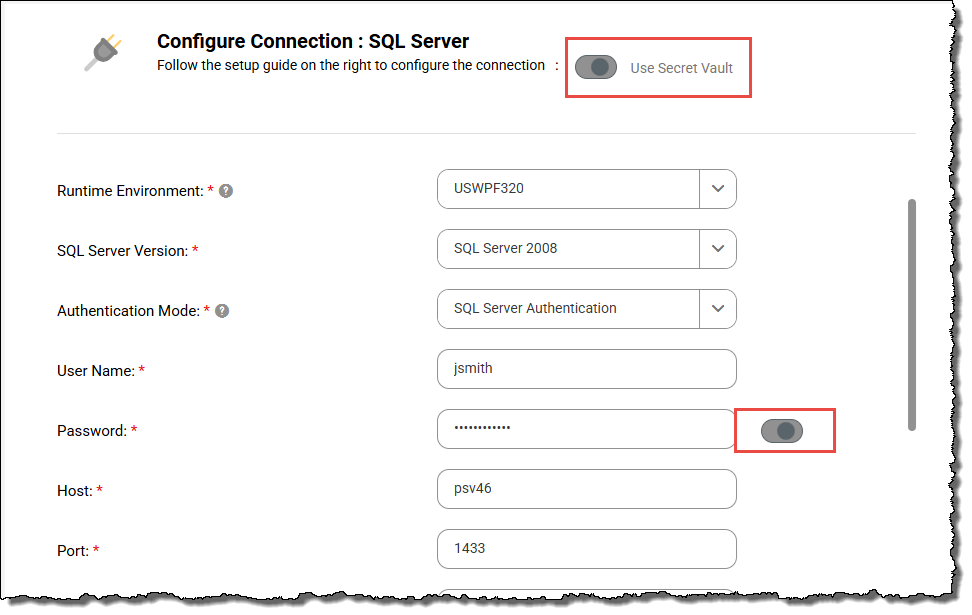
      The following image shows the connection details:
      The image shows the connection details for a SQL Server connection.
								In the SQL Server Connection properties area, the Use Secret Vault
								option is enabled. The option next to the Password field is also
								enabled and the Password field is masked with a series of dots.
      Effective in the July 2025 release, the capability to create connections in
      Data Integration
      when your organization uses a secrets manager is available for private preview.
      Preview functionality is supported for evaluation purposes but is unwarranted and is not supported in production environments or any environment that you plan to push to production. Informatica intends to include the preview functionality in an upcoming release for production use, but might choose not to in accordance with changing market or technical circumstances. For more information, contact Informatica Global Customer Support.
  3. Select the runtime environment to be used with the connection.
    If you use an external secrets manager, all Secure Agents within the runtime environment must be installed on a local machine or VM and must be able to access the secrets manager. Additionally, the SecretManagerApp service must be running on each agent.
  4. Configure the connection-specific properties.
    For example, if you configure a flat file connection, enter the directory where the files are stored, the date format for date fields in the files, and the code page of the system that hosts the files.
  5. To test the connection, click
    Test Connection
    .
  6. Click
    Save
    .

Back to Top

0 COMMENTS

We’d like to hear from you!