Table of Contents

Search

  1. Preface
  2. Analyst Service
  3. Catalog Service
  4. Content Management Service
  5. Data Integration Service
  6. Data Integration Service Architecture
  7. Data Integration Service Management
  8. Data Integration Service Grid
  9. Data Integration Service REST API
  10. Data Integration Service Applications
  11. Enterprise Data Preparation Service
  12. Interactive Data Preparation Service
  13. Informatica Cluster Service
  14. Mass Ingestion Service
  15. Metadata Access Service
  16. Metadata Manager Service
  17. Model Repository Service
  18. PowerCenter Integration Service
  19. PowerCenter Integration Service Architecture
  20. High Availability for the PowerCenter Integration Service
  21. PowerCenter Repository Service
  22. PowerCenter Repository Management
  23. PowerExchange Listener Service
  24. PowerExchange Logger Service
  25. SAP BW Service
  26. Search Service
  27. System Services
  28. Test Data Manager Service
  29. Test Data Warehouse Service
  30. Web Services Hub
  31. Application Service Upgrade
  32. Appendix A: Application Service Databases
  33. Appendix B: Connecting to Databases from Windows
  34. Appendix C: Connecting to Databases from UNIX or Linux
  35. Appendix D: Updating the DynamicSections Parameter of a DB2 Database

Step 2. Create a Grid

Step 2. Create a Grid

To create a grid, create the grid object and assign nodes to the grid. You can assign a node to one grid when the Data Integration Service is configured to run jobs in separate remote processes.
When a Data Integration Service grid runs mappings, profiles, and workflows in separate remote processes, the grid can include the following nodes:
  • Any number of nodes with the service role only.
  • Any number of nodes with the compute role only.
  • At least one node with both the service and compute roles to run previews and to run ad hoc jobs, with the exception of profiles.
If you associate a Content Management Service with the Data Integration Service to run mappings that read reference data, each node in the grid must have both the service and compute roles.
  1. In the
    Administrator tool
    , click the
    Manage
    tab.
  2. Click the
    Services and Nodes
    view.
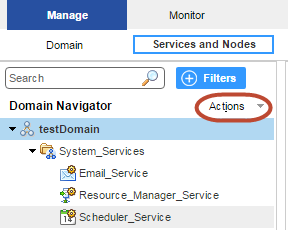
  3. In the Domain Navigator, select the domain.
    On the Services and Nodes view, the domain named testDomain is selected in the Domain Navigator.
  4. On the Navigator Actions menu, click
    New
    Grid
    .
    The
    Create Grid
    dialog box appears.
  5. Enter the following properties:
    Property
    Description
    Name
    Name of the grid. The name is not case sensitive and must be unique within the domain. It cannot exceed 128 characters or begin with @. It also cannot contain spaces or the following special characters:
    ` ~ % ^ * + = { } \ ; : ' " / ? . , < > | ! ( ) ] [
    Description
    Description of the grid. The description cannot exceed 765 characters.
    Nodes
    Select nodes to assign to the grid.
    Path
    Location in the Navigator, such as:
    DomainName/ProductionGrids
  6. Click
    OK
    .

0 COMMENTS

We’d like to hear from you!