Table of Contents

Search

  1. Preface
  2. Informatica Developer
  3. The Model Repository
  4. Searches in Informatica Developer
  5. Connections
  6. Physical Data Objects
  7. Flat File Data Objects
  8. Logical View of Data
  9. Viewing Data
  10. Application Deployment
  11. Object Import and Export
  12. Data Type Reference
  13. Keyboard Shortcuts
  14. Connection Properties

Developer Tool Guide

Developer Tool Guide

Check In Dialog Box

Check In Dialog Box

The
Check In
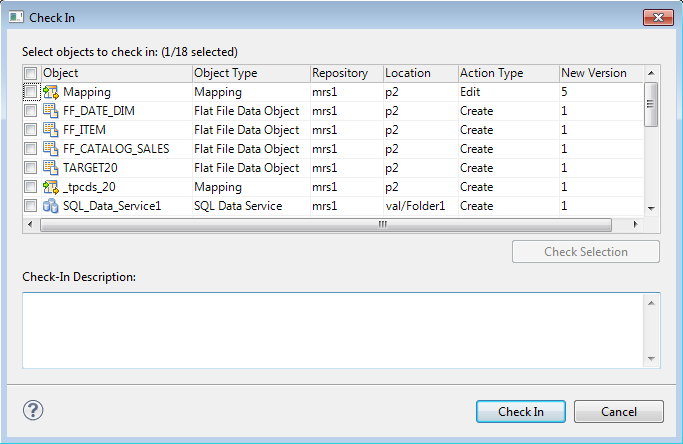
dialog box displays all objects you have checked out.
Use the
Check In
dialog box to check in objects. You can also use it to delete objects that you marked for delete.
The following image shows the
Check In
dialog box:
The
Action Type
column shows the action that the Model Repository Service performs on each item when you check it in. The Model Repository Service performs one of the following action types:
Action Type
Description
Create
The object is new and has never been checked in. When you select it and click
Check In
, the Model Repository Service checks it in to the version control system and assigns it a version number of 1.
Delete
The object is marked for delete. When you select it and click
Check In
, the Model Repository Service deletes the object.
Edit
The object is marked for edit. When you select it and click
Check In
, the Model Repository Service replaces the version in the version control system with the new version.
Move
After you checked out the object, you moved it from one Model repository project or folder to another. When you select it and click
Check In
, the Model Repository Service checks it in to the version control system in the new location.
The
Location
column shows the current location of the object. If you moved the object, the
Action Type
is Move.
You can see previous locations of a moved object in the
Version History
view.
The
New Version
column shows the version number of the object after you complete the checkin.
You can check in one or more objects in the
Check In
dialog box. Select objects to check in by performing one of the following actions:
  • Use the check box to select one or more objects.
  • Select one or more rows and click
    Check Selection
    to enable the check box for each object that you selected.
Optionally, you can add a description in the
Check-In Description
text pane. Then you can click
Check In
to check in all the selected objects.

0 COMMENTS

We’d like to hear from you!