Table of Contents

Search

  1. Preface
  2. Introduction to PowerExchange for Google BigQuery
  3. PowerExchange for Google BigQuery Configuration
  4. Google BigQuery Sources and Targets
  5. Google BigQuery Mappings
  6. Google BigQuery Sessions
  7. Google BigQuery as CDC Target
  8. Google BigQuery Pushdown Optimization
  9. Appendix A: Google BigQuery Data Type Reference

PowerExchange for Google BigQuery User Guide for PowerCenter

PowerExchange for Google BigQuery User Guide for PowerCenter

Configuring Google BigQuery ODBC Connection on Windows

Configuring Google BigQuery ODBC Connection on Windows

To establish an ODBC connection to connect to Google BigQuery on Windows using the Informatica ODBC Driver for Google BigQuery, install the Informatica ODBC driver for Google BigQuery, version 2.2.5.1012, on the Windows machine where the PowerCenter Integration Service runs and configure the ODBC connection.
  1. Download the
    InformaticaODBCDriverforGoogleBigQuery_2.2.5.1012_Windows.zip
    file,
    Register.bat
    file, and the
    DriverInstallHelper.jar
    file.
    For more information about downloading the Informatica Google BigQuery ODBC (64-bit) driver,
    Register.bat
    file, and the
    DriverInstallHelper.jar
    file, contact Informatica Global Customer Support.
    Download the
    Register.bat
    and
    DriverInstallHelper.jar
    files in the same location.
  2. After you download the Informatica Google BigQuery ODBC (64-bit) driver, extract the downloaded file.
  3. Navigate to the following directory where you extracted the
    InformaticaODBCDriverforGoogleBigQuery_2.2.5.1012_Windows.zip
    file:
    <Informatica ODBC Driver for Google BigQuery installation directory>\InformaticaODBCDriverforGoogleBigQuery_2.2.5.1012_Windows
  4. Extract the
    SimbaODBCDriverforGoogleBigQuery64_2.2.5.1012.zip
    file to the following directory.
    SimbaODBCDriverforGoogleBigQuery64_2.2.5.1012.zip
    file:
    <SimbaODBCDriverforGoogleBigQuery64_2.2.5.1012 installation directory>\SimbaODBCDriverforGoogleBigQuery64_2.2.5.1012\
  5. Navigate to the directory where you downloaded the
    Register.bat
    and
    DriverInstallHelper.jar
    file.
    The
    Register.bat
    file prompts you to specify the
    Input Installation Directory
    . Specify the directory where you installed the Informatica ODBC Driver for Google BigQuery.
  6. Open the Command Prompt as an administrator and navigate to the directory where you downloaded the
    Register.bat
    and
    DriverInstallHelper.jar
    file.
  7. Run the following command in the command prompt:
    Register.bat
    You must have administrator privileges to run the
    Register.bat
    file.
    The
    Register.bat
    file prompts you to specify the
    Input Directory Containing Registry File Template
    and
    Input Directory Containing Installation Files
    .
  8. Specify the following directory for the
    Input Directory Containing Registry File Template
    and press
    Enter
    :
    <Informatica ODBC Driver for Google BigQuery installation directory>\InformaticaODBCDriverforGoogleBigQuery_2.2.5.1012_Windows\setup
  9. Specify the following directory for the
    Input Directory Containing Installation Files
    and press
    Enter
    :
    <SimbaODBCDriverforGoogleBigQuery64_2.2.5.1012 installation directory>\SimbaODBCDriverforGoogleBigQuery64_2.2.5.1012\
    The
    Register.bat
    file creates the
    output.txt
    file and returns success or an error message.
  10. Click
    Start
    Control Panel
    .
  11. Click
    Administrative Tools
    .
  12. Click
    Data Sources (ODBC)
    .
    The
    ODBC Data Source Administrator
    dialog box appears.
  13. Click the
    System DSN
    tab.
    The
    System DSN
    tab appears.
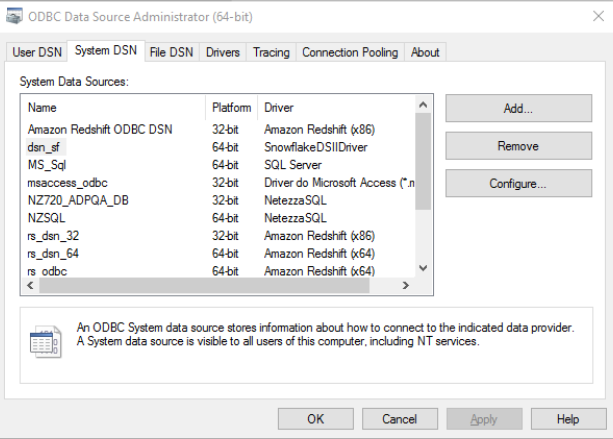
    The following image shows the System DSN tab on the ODBC Data Source Administrator (64-bit) dialog box:
    The image shows the System DSN on the ODBC Data Source Administrator (64-bit) dialog box.
  14. Click
    Add
    .
    The
    Create New Data Source
    dialog appears.
    The following image shows the Create New Data Source dialog where you can select the Google BigQuery data source:
    The following image shows the Informatica ODBC driver for Google BigQuery available for your operating system
  15. Select the
    Informatica ODBC Driver for Google BigQuery
    to set up the data source.
  16. Click
    Finish
    .
    The
    Informatica ODBC Driver for Google BigQuery DSN Setup
    dialog box appears.
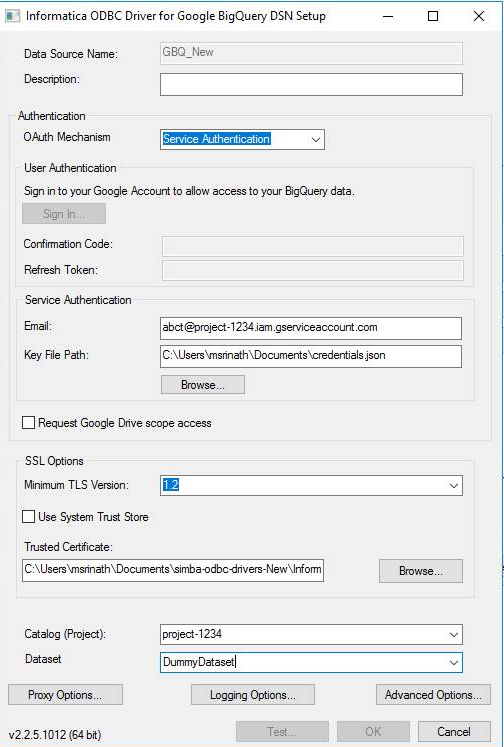
    The following image shows the connection properties in the
    Informatica ODBC Driver for Google BigQuery DSN Setup
    dialog box:
    The following image shows the connection configuration properties in the Informatica ODBC Driver for Google BigQuery DSN Setup dialog box
  17. Specify the following connection properties:
    Property
    Description
    Data Source Name
    Enter a name for the data source. The ODBC Driver for Google BigQuery uses the DSN to connect to the Google BigQuery.
    Description
    Enter a description.
    OAuth Mechanism
    The OAuth 2.0 authentication mechanism used to authenticate the driver. Select the
    Service Authentication
    option to authenticate the driver through a Google service account.
    If you select the
    User Authentication
    option, you will need to sign in to your Google service account. Click on
    Sign In
    and in the browser that opens, enter your credentials and then click
    Sign In
    . Click
    Accept
    to allow the Google BigQuery Client Tools to access Google BigQuery objects.
    Confirmation Code
    Code that Google provides when you click
    Accept
    . Copy and paste the code in the
    Confirmation Code
    field.
    Refresh Token
    The OAuth Mechanism populates the
    Refresh Token
    field when you paste the confirmation code.
    Email
    Specify the Google service account email ID. This field is needed to authenticate the service account.
    Key File Path
    Enter the path to the .p12 or JSON key file that is used to authenticate the Google service account.
    Request Google Drive scope access
    Allows the driver to access Google Drive so that the driver can support federated tables that combine Google BigQuery data with data from Google Drive.
    Trusted Certificates
    Path of the
    .pem
    file. Use the trusted CA certificates from a specific
    .pem
    file or use the trusted CA certificates
    .pem
    file that is installed with the driver.
    If you specify the Trusted Certificates .pem file path, you do not need to select the
    Use System Trust Store
    option.
    Use System Trust Store
    If you select the
    Use System Trust Store
    option, you do not need to specify the Trusted Certificates
    .pem
    file path.
    Catalog (Project)
    Name of the Google BigQuery project associated with your billing account that the Simba ODBC Driver for Google BigQuery queries.

0 COMMENTS

We’d like to hear from you!