Table of Contents

Search

  1. Preface
  2. Getting Started Overview
  3. Getting Started with Informatica Analyst
  4. Getting Started with Informatica Developer
  5. Frequently Asked Questions

Getting Started Guide

Getting Started Guide

Task 1. Import the Boston_Customers Flat File Data Object

Task 1. Import the Boston_Customers Flat File Data Object

In this task, you import a physical data object from a file that contains customer data from the Boston office.
  1. In the
    Object Explorer
    view, select the Tutorial_Objects folder.
    The Developer tool shows multiple views. The Object Explorer view shows the Tutorial_Objects folder in the Tutorial project. The other views contain no objects.
  2. Right-click the Tutorial_Objects folder and select
    New
    Data Object
    .
    The
    New
    dialog box appears.
    The wizard shows the different types of data objects that you can create. It lists logical data object and multiple types of physical data objects, such as flat file, relational, and SAP.
  3. Select
    Physical Data Objects
    Flat File Data Object
    and click
    Next
    .
    The
    New Flat File Data Object
    dialog box appears.
    The wizard shows options to create an empty physical data object or a physical data object based on a flat file. The wizard also contains options that specify the file name and location if you create a physical data object based on a flat file. Click Browse to select the flat file. Click Back and Next to navigate through the wizard.
  4. Select
    Create from an existing flat file
    .
  5. Click
    Browse
    and navigate to Boston_Customers.csv in the following directory on the Developer tool machine:
    <Informatica installation directory>\clients\DeveloperClient\Tutorials
  6. Click
    Open
    .
    The wizard names the data object "Boston_Customers."
  7. Click
    Next
    .
  8. Verify that the code page is set to
    MS Windows Latin 1 (ANSI), superset of Latin 1
    and the format is set to
    Delimited
    .
    The
    New Flat File Data Object
    dialog box shows the default code page, the format, and a preview of the flat file data.
    The wizard shows the MS Windows Latin 1 (ANSI), superset of Latin 1 code page, delimited format, and a preview of the flat file data. The data preview shows the customer ID, customer region, and customer tier for multiple customers. You can change the maximum number of rows for preview, which is set to 500.
  9. Click
    Next
    .
  10. Select
    Import column names from first line
    .
    The
    New Flat File Data Object
    dialog box shows the column names in the preview of the flat file data.
    The wizard shows the delimiter, text qualifier, preview options, and data preview. The data preview shows the following columns of data: CustomerID, Customer_Region, and CustomerTier.
    1. The
      Import column names from first line
      option
    2. Column names
  11. Click
    Finish
    .
    The Boston_Customers physical data object appears under the Physical Data Objects folder in the Tutorial_Objects folder. The
    Overview
    view displays the file content and it is open in the editor.
    The Developer tool shows multiple views. The Object Explorer view shows the Boston_Customers physical data object. The editor shows properties about the data object fields, such as the field names, native types, precisions, and scales. The Outline view shows the different views that appear in the editor for the physical data object.
  12. Click the
    Advanced
    view.
    The
    Advanced
    view shows properties for the physical data object.
  13. In the
    Advanced
    view, scroll to the
    Run-time: Read
    section.
  14. In the
    Run-time: Read
    section, set
    Source file directory
    to the following directory on the Data Integration Service machine:
    <Informatica installation directory>\server\Tutorials
    The Data Integration Service searches for the source file in the server directory on the machine that runs the Data Integration Service. The server installation contains a copy of the tutorial files. The Data Integration Service cannot read files from the client installation directory unless you change access permissions on the source file and directory.
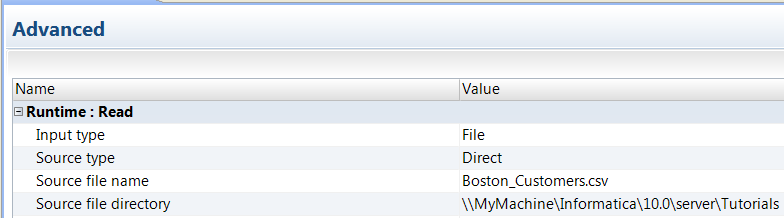
    The following figure shows a sample source file directory:
    The Developer tool machine must have access to the source file directory on the machine that runs the Data Integration Service. If the Developer tool cannot access the source file directory, the Developer tool cannot preview data in the source file or run mappings that access data in the source file. If you run multiple Data Integration Services, there is a separate source file directory for each Data Integration Service.
  15. Click the
    Data Viewer
    view.
  16. In the
    Data Viewer
    view, click
    Run
    .
    The Data Integration Service reads the data from the Boston_Customers file and shows the results in the Output window.
  17. Click
    File
    Save
    to save the Boston_Customers physical data object.

0 COMMENTS

We’d like to hear from you!