Getting Started

Getting Started

Downloading and installing the Secure Agent on Windows

Downloading and installing the Secure Agent on Windows

To install the Secure Agent on a Windows machine, you must download and run the Secure Agent installation program and then register the agent.
Secure Agent registration requires an install token. To get the install token, copy the token when you download the agent or use the
Generate Install Token
option in
Administrator
. The token expires after 24 hours.
Before you download and install the Secure Agent, verify that no other Secure Agent is installed on the machine. If any other Secure Agent exists, you must uninstall it.
To verify the checksum of the Secure Agent installation program, use the agent REST API version 2 resource. For more information about the agent resource, see
REST API Reference
.
  1. Open
    Administrator
    and select
    Runtime Environments
    .
  2. On the
    Runtime Environments
    page, click
    Download Secure Agent
    .
  3. Select the Windows 64-bit operating system platform, copy the install token, and then click
    Download
    .
    The installation program is downloaded to your machine. The name of the installation program is
    agent64_install_ng_ext.<agent core version>.exe
    .
  4. Run the installation program as an Administrator:
    1. Specify the Secure Agent installation directory, and click
      Next
      .
    2. Click
      Install
      to install the agent.
    The
    Cloud Secure Agent
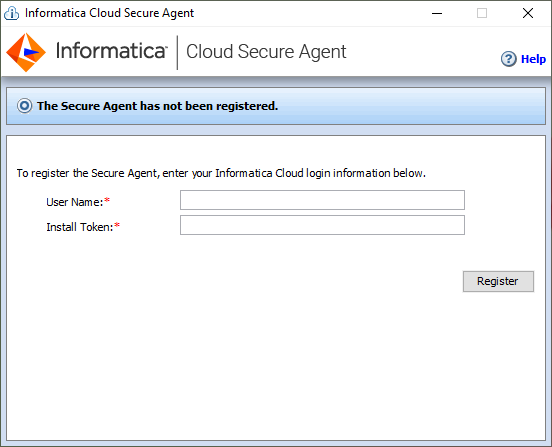
    dialog box opens and prompts you to register the agent as shown in the following image:
    The Secure Agent Manager displays a message alerting you that the Secure Agent has not been registered. To register the agent, you must enter your user name in the User Name field, paste the install token into the Install Token field, and then click Register.
  5. If you did not copy the install token when you downloaded the agent, click
    Generate Install Token
    on the
    Runtime Environments
    page in
    Administrator
    , and copy the token.
  6. In the Secure Agent Manager, enter the following information, and then click
    Register
    :
    Option
    Description
    User Name
    User name that you use to access
    Informatica Intelligent Cloud Services
    .
    Install Token
    Token that you copied.
    The Secure Agent Manager displays the status of the Secure Agent. It takes a minute for all of the services to start.
  7. If your organization uses an outgoing proxy server to connect to the internet, enter the proxy server information.
  8. Close the Secure Agent Manager.
    The Secure Agent Manager minimizes to the taskbar and continues to run as a service until stopped.

0 COMMENTS

We’d like to hear from you!