Table of Contents

Search

  1. Preface
  2. Part 1: Installation Getting Started
  3. Part 2: Before You Install the Services
  4. Part 3: Run the Services Installer
  5. Part 4: After You Install the Services
  6. Part 5: Informatica Client Installation
  7. Part 6: Uninstallation
  8. Appendix A: Starting and Stopping Informatica Services
  9. Appendix B: Managing Distribution Packages
  10. Appendix C: Connecting to Databases from UNIX or Linux
  11. Appendix D: Connecting to Databases from Windows
  12. Appendix E: Updating the DynamicSections Parameter of a DB2 Database

Installation for PowerCenter and Data Quality

Installation for PowerCenter and Data Quality

Domain Selection

Domain Selection

After you review the Pre-Installation summary, you can enter the domain information.
  1. Review the
    Pre-Installation Summary
    page.
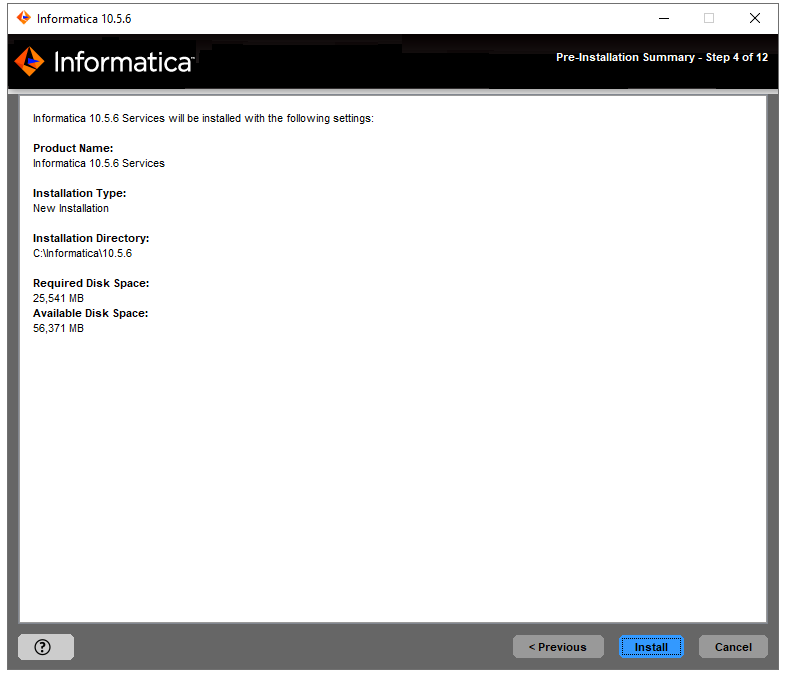
    This image describes the pre-installation summary.
  2. Review the installation information, and click
    Install
    to continue.
    The installer copies the Informatica files to the installation directory. After the installer copies the files, the
    Domain Selection
    page appears.
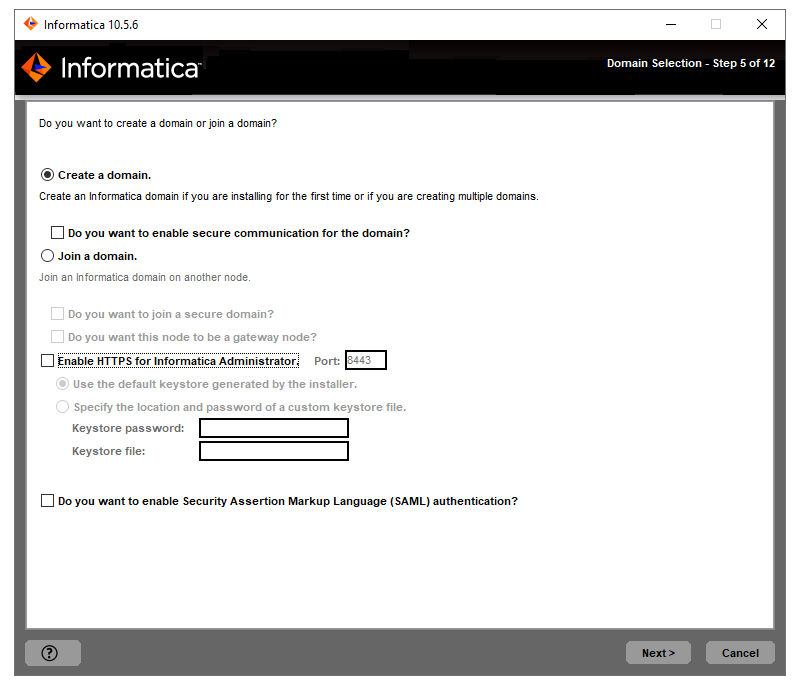
    This image describes about creating a domain or join a domain on a node.
  3. Select
    Join a domain
    .
    The installer joins a node on the machine where you install.
    When you create a domain, the node that you create becomes a gateway node in the domain. The gateway node contains a Service Manager that manages all domain operations.
  4. Specify whether the domain you want to join has the secure communication option enabled.
    Press
    1
    to join an unsecure domain or press
    2
    to join a secure domain.
  5. Select the type of node you want to create.
    Press
    1
    to configure a gateway node or
    2
    to configure a worker node.
    If you configure the node as a gateway, you can enable a secure HTTPS connection to the Informatica Administrator.
  6. If you enable HTTPS connection for the Informatica Administrator, enter an HTTPS port number to use to secure the connection.
  7. Select whether to use the default Informatica SSL certificates or to use your SSL certificates to enable SAML authentication in the domain.
    The following table describes the SSL certificate options for SAML authentication:
    Option
    Description
    Use the default Informatica SSL certificate file.
    Select to use the default Informatica truststore file for SAML authentication.
    Enter the location of the SSL certificate file.
    Select to use a custom truststore file for SAML authentication. Specify the directory containing the custom truststore file on gateway nodes within the domain. Specify the directory only, not the full path to the file.
  8. To configure Security Assertion Markup Language (SAML) based single sign-on (SSO) support for web-based Informatica applications in an Informatica domain, select the checkbox to enable SAML authentication.
    If you enable Kerberos network authentication, you cannot configure SAML authentication.
  9. Click
    Next
    .
    If you select the checkbox to enable SAML authentication option, the
    SAML Authentication
    page appears.
    This image describes about SAML authentication that you can enter to configure the single sign on support for Informatica web application. ]
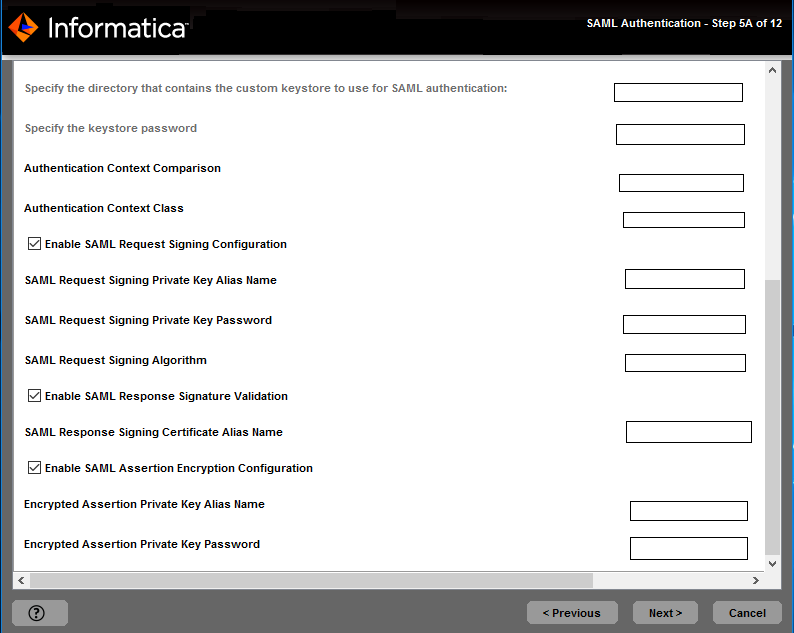
    This image describes about SAML authentication properties.
  10. Enter the Identity Provider URL for the domain.
  11. Specify the relying party trust name or the service provider identifier for the domain as defined in the identity provider. If you choose No, the service provider identifier is set to "Informatica" .
  12. Specify whether IdP will sign SAML assertion or not.
  13. Enter the identity provider assertion signing certificate alias name.
  14. Specify whether to use the default Informatica SSL certificates or to use your SSL certificates to enable secure communication in the domain.
    The following table describes the SSL certificate options for SAML authentication:
    Option
    Description
    Use the default Informatica SSL certificate file.
    Select to use the default Informatica truststore file for SAML authentication.
    Enter the location of the SSL certificate file.
    Select to use a custom truststore file for SAML authentication. Specify the directory containing the custom truststore file on gateway nodes within the domain. Specify the directory only, not the full path to the file.
  15. If you provide the security certificates, specify the location and passwords of the keystore and truststore files.
    The following table describes the location and password of the truststore and keystore files:
    Property
    Description
    Truststore Directory
    Specify the directory containing the custom truststore file on gateway nodes within the domain. Specify the directory only, not the full path to the file.
    Truststore Password
    The password for the custom truststore file.
    Keystore Directory
    Specify the directory containing the custom keystore file.
    Keystore Password
    The password for the custom keystore file.
  16. To specify the Authentication Context Comparison, specify the strength comparison of the authentication mechanism used by the user with the IdP server.
    Supported values are MINIMUM, MAXIMUM, BETTER, or EXACT option. Default is MINIMUM.
  17. To set the Authentication Context Class, specify the expected mechanism of first time authentication of the user with the IdP server.
    Supported values are PASSWORD or PASSWORDPROTECTEDTRANSPORT. Default is PASSWORD.
  18. Specify if you want to enable the webapp to sign the SAML authentication request or not?
    Default is disabled.
  19. Specify the alias name of the private key that was imported to the node SAML keystore using which the SAML request should be signed.
  20. Specify the password to access the private key used for signing the SAML request.
  21. Specify the algorithm that the web application uses to sign the SAML request.
    Supported values are
    RSA_SHA256, DSA_SHA1, DSA_SHA256, RSA_SHA1, RSA_SHA224, RSA_SHA384, RSA_SHA512, ECDSA_SHA1, ECDSA_SHA224, ECDSA_SHA256, ECDSA_SHA384, ECDSA_SHA512, RIPEMD160, or RSA_MD5
    .
  22. Specify whether you want IdP to sign the SAML response or not?
    Choose to select to enable the webapp to receive the signed SAML response or not. Default is disabled.
  23. Specify whether IdP will encrypt SAML assertion or not.
    Select to enable the webapp to receive an encrypted SAML assertion. Default is enabled.
  24. Specify the alias name of the private key present in the gateway nodes gateway node SAML truststore that used for Informatica uses to decrypt decrypting the SAML assertion.
  25. Provide the password to access the private key to use when decrypting the assertion encryption key.
  26. Click
    Next
    .
If you do not enable secure communication for the domain, the
Domain Configuration
page appears. Skip to step that describes the Domain Configuration Repository page. If you selected the checkbox to enable secure communication for the domain, the
Domain Security - Secure Communication
page appears.

0 COMMENTS

We’d like to hear from you!