Table of Contents

Search

  1. Preface
  2. Document Processing
  3. Operation Console
  4. Partners and Profiles
  5. On-Boarding Checklists
  6. Endpoints
  7. MFT Connections
  8. MFT Web Users
  9. Events and Event Monitoring
  10. Event Monitors
  11. Reconciliations
  12. Event Resubmission
  13. Audit and Authorization
  14. Advanced Exception Handling
  15. Dashboard and Reports
  16. Service Level Agreement Management
  17. Glossary

Editing an On-boarding Checklist

Editing an On-boarding Checklist

You can view details and update task progress for on-boarding checklists.
  1. In the Navigator, click
    Partner Management
    On-boarding
    .
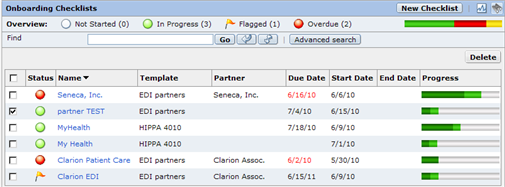
    The On-boarding Checklists page appears.
    The On-boarding Checklists page is divided into two parts.
    The upper part is called the Overview. It shows the number of incomplete checklists according to the checklist status:
    • Not started.
      A checklist for which no task started.
    • In progress.
      A checklist that started but not was not completed.
    • Flagged.
      A checklist with a flagged task.
    • Overdue.
      An In Progress checklist whose due date is past.
    The status bar to the right of the checklist status shows the number of active tasks by status:
    • Green.
      In Progress.
    • Red.
      Overdue.
    • Yellow.
      Flagged.
    The lower part of the page displays information about the checklists that are in progress. Note the progess bar at the right of each checklist. Dark green bars show the number of completed tasks, light green indicates the number of in-progress tasks, and grey indicates the number of tasks that have not started. The progress bar has a fixed length, regardless of how many tasks are in the checklist. The length each colored bar is proportional to the ratio between the different categories of task progress.
    If a task is overdue, the due date is displayed in red.
  2. To search for on-boarding checklists, Click
    Advanced Search
    .
    The advanced search window appears.
    You can use the following parameters to search inside on-boarding checklists:
    Parameter
    Description
    Checklist Name
    Name of the checklist.
    Partner Name
    Name of the partner.
    Template Name
    Name of the on-boarding checklist template.
    Status
    Status of the checklists.
    Deadline
    A specific number of days before or after the checklist due date.
    Operator
    Logical operators to include in the search:
    • OR. Search for any of the fields that contain values.
    • AND. Search for all of the fields that contain values.
    Start Date
    A range of dates during which the checklist started. Click
    Browse
    to open the calendar tool. Click
    X
    to delete the date.
    Due Date
    A range of dates during which the checklist is due to be completed. Click
    Browse
    to open the calendar tool. Click
    X
    to delete the date.
    End Date
    A range of dates during which the checklist was completed. Click
    Browse
    to open the calendar tool. Click
    X
    to delete the date.
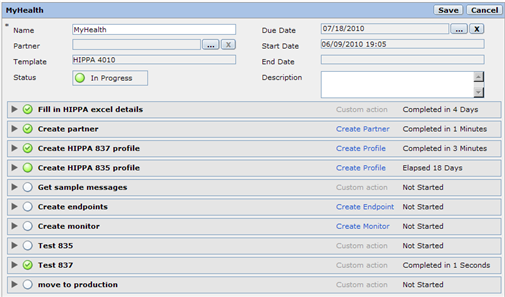
  3. Click the name of the checklist that you want to edit.
    The selected checklist appears and displays the tasks and task statuses.
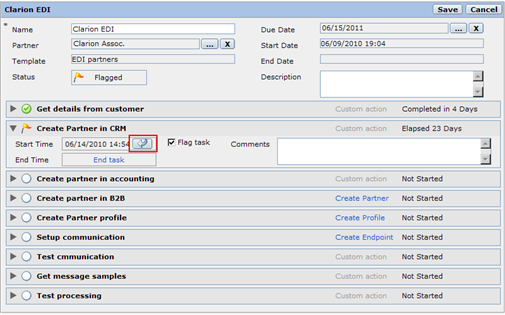
  4. To edit the details of a task, click the arrowhead icon of the task you want to edit.
    The details of the chosen task appear:
    The following table describes the properties of a task
    Field
    Description
    Circle Icon
    Read-only. The status of the task:
    • Empty circle. Task has not yet started. Start Time is blank.
    • Green circle. Task is in progress. Start Time has a value. End Time is blank.
    • Check mark. Task is complete. End Time has a value.
    Task Name
    Read-only. Taken from the checklist template.
    Task Action
    If the task is to perform a B2B Data Exchange operation, like Create Partner, click the link to open the appropriate B2B Data Exchange Operation Console page. When you close this page, you are returned to the checklist page.
    If the task is a custom task, the task Action is read-only.
    Task description
    Read-only.
    Task Status
    Read-only.
    Start Time
    Date and time the task was started.
    End Time
    Date and time the task was completed.
    Flag Task
    Select to flag (mark) this task for special attention. To explain the reason for the flag, use the Description field.
    Description
    Task description.
  5. To indicate that the handling of this task has begun, and to set the Start Time to the current date and time, click Start task.
  6. To indicate that the task is complete, expand the task and click End Task.
    When you click Start or End Task, the Undo button appears. Start and End times are used for statistical analysis of the status of all tasks. Report start and end times on time.
  7. To flag a task, select Flag task.
  8. To edit the Description field. type in the text box.
  9. Click Save.

0 COMMENTS

We’d like to hear from you!