Table of Contents

Search

  1. Preface
  2. Product Overview
  3. Before You Begin
  4. Tutorial Lesson 1
  5. Tutorial Lesson 2
  6. Tutorial Lesson 3
  7. Tutorial Lesson 4
  8. Tutorial Lesson 5
  9. Tutorial Lesson 6
  10. Naming Conventions
  11. Glossary

Getting Started

Getting Started

Completing the Mapping

Completing the Mapping

The final step is to map data to the remaining columns in targets.
  1. Connect the columns from the Source Qualifier transformation to the targets.
    The following table describes the Source Qualifier transformation columns, target table, and the column name:
    Source Qualifier
    Target Table
    Column
    PROMOTION_ID
    D_PROMOTIONS
    PROMOTION_ID
    PROMOTION_NAME
    D_PROMOTIONS
    PROMOTION_NAME
    DESCRIPTION
    D_PROMOTIONS
    DESCRIPTION
    START_DATE
    D_PROMOTIONS
    START_DATE
    END_DATE
    D_PROMOTIONS
    END_DATE
    MANUFACTURER_ID
    D_MANUFACTURERS
    MANUFACTURER_ID
    MANUFACTURER_NAME
    D_MANUFACTURERS
    MANUFACTURER_NAME
    ITEM_ID
    F_PROMO_ITEMS
    FK_ITEM_ID
    PROMOTION_ID
    F_PROMO_ITEMS
    FK_PROMOTION_ID
    MANUFACTURER_ID
    F_PROMO_ITEMS
    FK_MANUFACTURER_ID
    DISCOUNT
    F_PROMO_ITEMS
    DISCOUNT
    COMMENTS
    F_PROMO_ITEMS
    COMMENTS
  2. Click
    Repository
    Save
    .
The mapping is now complete. You can create and run a workflow with this mapping.
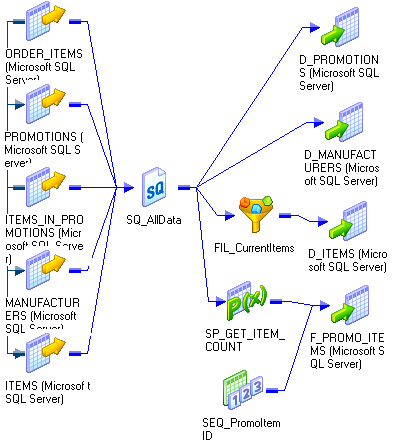
The following image shows the mapping you created in this lesson:
The mapping contains several sources joined by one source qualifier and several targets. The source qualifier connects directly to two targets. It connects to a third target through a Filter transformation. It connects to a fourth target through a Stored Procedure transformation. An Update Strategy transformation also connects to the fourth target.

0 COMMENTS

We’d like to hear from you!