Table of Contents

Search

  1. Preface
  2. Understanding Domains
  3. Managing Your Account
  4. Using Informatica Administrator
  5. Using the Domain View
  6. Domain Management
  7. Nodes
  8. High Availability
  9. Connections
  10. Connection Properties
  11. Schedules
  12. Domain Object Export and Import
  13. License Management
  14. Monitoring
  15. Log Management
  16. Domain Reports
  17. Node Diagnostics
  18. Understanding Globalization
  19. Appendix A: Code Pages
  20. Appendix B: Custom Roles
  21. Appendix C: Informatica Platform Connectivity
  22. Appendix D: Configure the Web Browser

Administrator Guide

Administrator Guide

Creating a Schedule

Creating a Schedule

Create a schedule to run deployed mappings, deployed workflows, profiles, or scorecards at a specified time.
  1. In the Administrator tool, click the
    Manage
    tab.
  2. Click the
    Schedules
    view.
  3. Click
    Actions
    Create Schedule
    .
    The
    Properties
    dialog box appears.
  4. Enter a name and an optional description for the schedule.
  5. In the
    Recurrence
    section, choose
    Run Once
    to run the schedule one time, or choose
    Recurring Schedule
    to run the schedule on an interval.
  6. If you are creating a recurring schedule, specify whether to run the job on a
    Daily
    ,
    Weekly
    , or
    Monthly
    interval.
    The following table describes the recurrence options that you can configure:
    Option
    Description
    Daily - Run every
    Run the job every n days
    Daily - Run after every
    Run the job every n minutes or hours
    Weekly
    Run the job on a day or days of the week
    Monthly - Run every n day
    Run the job on a day of the month
    Monthly - Run every
    Run the job on a day even n week of the month
    Monthly - Run every last day of the month
    Run the job on the last day of the month
  7. In the
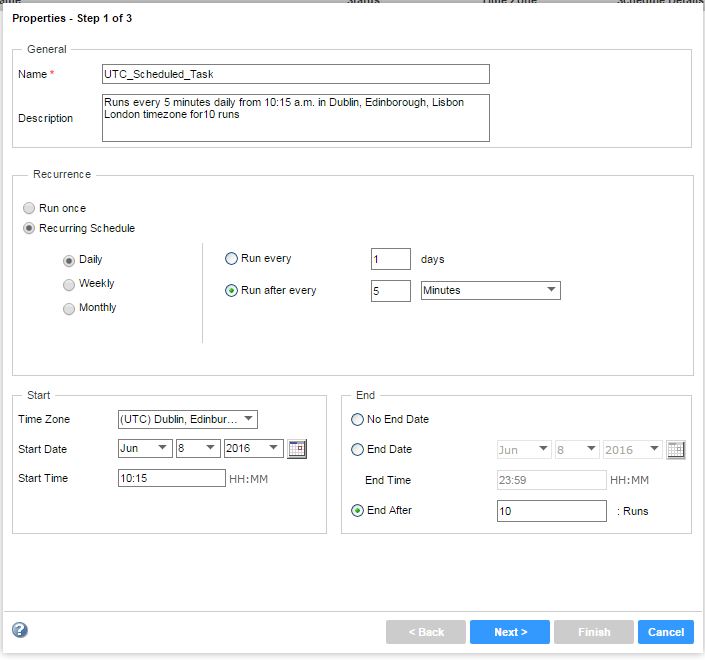
    Start
    section, configure a start date and time for the schedule.
  8. Select the time zone for the schedule from the list.
    The default time zone is the time zone of the client machine.
  9. If you are creating a recurring schedule, you can optionally configure an end date and time.
    You can end the recurrence on a specific date or after n runs.
    The following image shows the Scheduler Wizard:
  10. Click
    Next
    .
    The
    Applications
    dialog box appears.
  11. Expand a Data Integration Service and select jobs to run on the schedule.
  12. Optionally, upload a parameter file to define parameters for the mapping or workflow.
    1. Select a mapping or a workflow.
      The
      Application Properties
      section appears.
    2. Click
      Upload
      .
      The
      Upload Parameter File
      dialog box appears.
    3. Click
      Choose Files
      .
    4. Browse for a file, and then click
      Open
      .
    5. Click
      OK
      .
  13. Optionally, select a parameter set.
  14. Optionally, configure the
    Run As User
    property to run the job as a different user.
    1. Click
      Change
      .
      The
      Run As
      dialog box appears.
    2. Expand the user list.
    3. Select a user.
    4. Enter the password for the user.
    5. Click
      OK
      .
  15. Click
    Next
    .
    The
    Review
    window appears and lists the schedule properties.
  16. Click
    Finish
    to create the schedule.
    The schedule appears in the list of schedules in the Navigator.

0 COMMENTS

We’d like to hear from you!