Table of Contents

Search

  1. Preface
  2. Introduction to Enterprise Data Manager
  3. Enterprise Data Manager
  4. ILM Repository Constraints
  5. Partition Exchange Purging
  6. APIs
  7. Salesforce Accelerator
  8. Appendix A: SAP Application Retirement Entities
  9. Appendix B: Import Formats for Constraints
  10. Appendix C: Glossary

Enterprise Data Manager Guide

Enterprise Data Manager Guide

Creating a List of Values

Creating a List of Values

Create a List of Values to associate values with a parameter for an entity.
During Archive Definition, you supply values for these parameters from a List of Values. The list is populated internally by building an SQL query according to a List of Values definition.
To create a List of Values, perform the following steps:
  1. Select the required Application Module and click
    Insert
    List of Values
    .
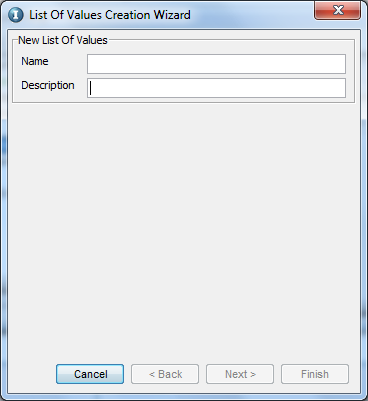
    The first page of the
    List of Values Creation Wizard
    appears as shown in the following image:
    In the first page of the List of Values Creation Wizard, enter a name for the List of Values in the Name field. In the Description field, enter a description for the List of Values.
  2. Enter a name and description for the List of Values and click
    Next
    .
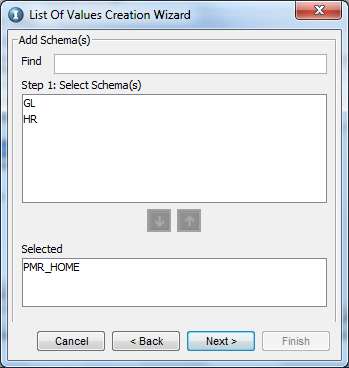
    The following page appears:
    In the second page of the List of Values Creation Wizard, select a schema.
  3. To add a schema to the
    Selected
    pane, select a schema from the
    Select Schema(s)
    pane and click the down arrow. To clear the selection, select the selected schema and click the up arrow (Step 2). When you are finished, click
    Next
    .
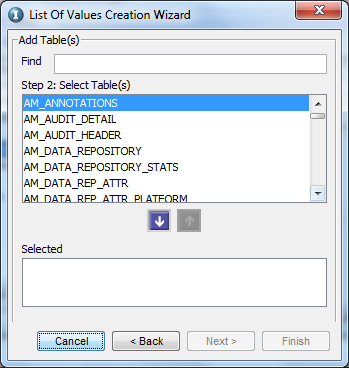
    The following page appears:
    In the third page of the List of Values Creation Wizard, select Business tables. To search for a table, enter the table name in the Find field at the top of the page.
  4. To select Business Tables (Step 3) click the down arrow (or click the up arrow to clear the selection). Click
    Next
    .
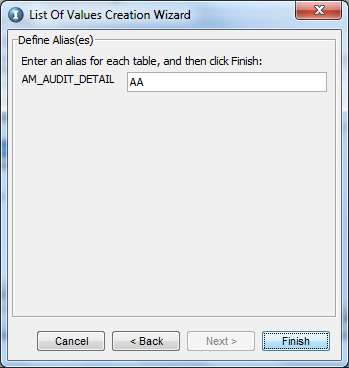
    The following page appears:
    In the last page of the List of Values Creation Wizard, define aliases for each table you selected.
  5. Specify aliases for each of the selected tables (Step 4) and click
    Finish
    .
    When you complete the wizard, the List of Values is created and appears in the
    List of Values
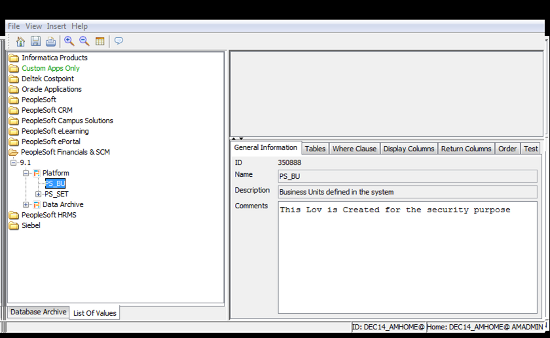
    tab of the Explorer pane. Each List of Values appears with the following tabs in the Details pane:
    Each List of Values displays the following tabs in the Details pane: General Information, Tables, Where Clause, Display Columns, Return Columns, Order, and Test.
    List of Values Detail Tab
    Function
    General Information
    Basic information about the List of Values such as:
    • Auto generated ID
    • Name (specified in
      List of Values Creation Wizard
      )
    • Description (specified in
      List of Values Creation Wizard
      )
    • Comments
    Tables
    Selected tables with the following information:
    • Order of Tables according to selection from
      List of Values Creation Wizard
      . To change the order, click the up or down arrows.
    • Table Name
    • Table Alias (as specified in
      List of Values Creation Wizard
      ).
    • Check boxes to determine whether to include the table in the FROM clause of the SQL query.
    To add or delete tables, click
    Add
    or
    Delete
    .
    Where Clause
    The WHERE clause for filtering data.
    Display Columns
    Columns to select in the SQL query. Each column appears with the following information:
    • Order of selection. To change the order, click the up arrow and down arrow.
    • Expression to execute on the column. For example, TOCHAR(). Generally, you specify the column name here.
    • Data Type for the column.
    • Label / Alias for the column (column heading)
    To add or delete columns, click
    Add
    or
    Delete
    .
    Return Columns
    Return value for the SQL query (not displayed in the List of Values).
    Order
    Columns for the ORDER BY clause for sorting data.
    Test
    The SQL query, built from the previously specified information.
    If values are not valid and the query does not comply with SQL syntax, error messages appear in this area.
  6. Click
    Save
    to save changes to the List of Values from the Details pane.
    The Detail pane for a List of Values appears. The
    Test
    tab shows the SQL query that fetches values for this List of Values.
    The selected tables appear in the Canvas pane.

0 COMMENTS

We’d like to hear from you!