Table of Contents

Search

  1. Preface
  2. Part 1: Installation Getting Started
  3. Part 2: Before You Install the Services
  4. Part 3: Run the Services Installer
  5. Part 4: After You Install the Services
  6. Part 5: Informatica Client Installation
  7. Part 6: Uninstallation
  8. Appendix A: Starting and Stopping Informatica Services
  9. Appendix B: Managing Distribution Packages
  10. Appendix C: Connecting to Databases from UNIX or Linux
  11. Appendix D: Connecting to Databases from Windows
  12. Appendix E: Updating the DynamicSections Parameter of a DB2 Database

Installation for PowerCenter and Data Quality

Installation for PowerCenter and Data Quality

Domain and Node Configuration

Domain and Node Configuration

After you configure the encryption key, you can configure the domain and node.
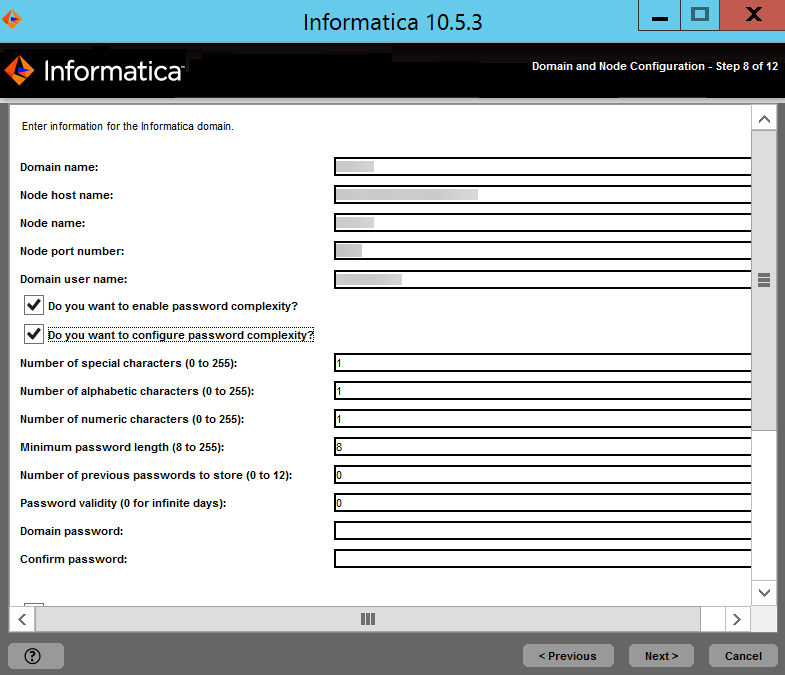
  1. Enter the information for the domain and the node that you want to create.
    This image describes the domain node configuration information.
    The following table describes the properties that you set for the domain and gateway node.
    Property
    Description
    Domain name
    Name of the Informatica domain to create. The default domain name is Domain_<MachineName>.
    The name must not exceed 128 characters and must be 7-bit ASCII only. The name cannot contain a space or any of the following characters:
    ` % * + ; " ? , < > \ /
    Node name
    Name of the node to create.
    Node host name
    Host name or IP address of the machine on which to create the node.
    If the machine has a single network name, use the default host name. If the a machine has multiple network names, you can modify the default host name to use an alternate network name.
    The node host name cannot contain the underscore (_) character. Do not use localhost. The host name must explicitly identify the machine.
    Node port number
    Port number for the node. The default port number for the node is 6005. If the port number is not available on the machine, the installer displays the next available port number.
    Domain user name
    User name for the domain administrator. You can use this user name to initially log in to Informatica Administrator. Use the following guidelines:
    • The name is not case sensitive and cannot exceed 128 characters.
    • The name cannot include a tab, newline character, or the following special characters: % * + / ? ; < >
    • The name can include an ASCII space character except for the first and last character. Other space characters are not allowed.
    The following table describes the password complexity:
    Prompt
    Description
    Password complexity
    Select whether you want to enable password complexity.
    If you select Yes, the password must meet the following requirements:
    It must be at least eight characters long and contain at least one alphabetic character, one numeric character, and one special character.
    Configure password policy
    Select whether you want to configure a password policy.
    If you select Yes, you can configure password complexity rules.
    If you select No, the default Informatica password policy rules apply.
    Number of special characters
    The minimum number of special characters required in a password.
    You can use the following special characters: [ ! " # $ % & ' ( ) * + , - . / : ; < = > ? @ [ ] ^ _ ` { | } ~ ]
    You can enter a value between 0 and 128. Default is 1.
    Number of alphabetic characters
    The minimum number of alphabetic characters required in a password.
    You can enter a value between 0 and 128. Default is 1.
    Number of numeric characters
    The minimum number of numeric characters required in a password.
    You can enter a value between 0 and 128. Default is 1.
    Minimum password length
    The minimum number of characters required in a password.
    You can enter a value between 1 and 128. Default is 8.
    Number of previous passwords to store
    The number of consecutive previous passwords that can't be reused.
    You can enter a value between 0 and 12. Default is 0.
    Password expiration in days
    The duration of the validity of a password.
    If you don't want passwords to expire, set the value to 0. Default is 0.
    Domain password
    Password for the domain administrator.
    • If you don't enable password complexity, the password must be between 2 and 16 characters.
    • If you enable password complexity, the password must be at least eight characters long and contain at least one alphabetic character, one numeric character, and one special character.
    • If you configure a password policy, the password must meet the complexity rules that you set.
    Not available if you configure the Informatica domain to run on a network with Kerberos authentication.
    Confirm password
    Enter the password again to confirm.
    Not available if you configure the Informatica domain to run on a network with Kerberos authentication.
  2. To display the default ports for the domain and node components assigned by the installer, enable
    Display advanced port configuration page
    .
    If you display the port configuration page, the installer displays the default port numbers assigned to the domain and node. You can modify the port numbers or specify a different range of port numbers for the application service processes. If you do not select the display the port configuration page, the installer does not display the default port numbers and you cannot modify the assigned port numbers.
  3. Select the checkbox to create the Model Repository Service and Data Integration Service during the installation.
    If you do not configure the services, the installer does not create a Model Repository Service or a Data Integration Service in the new domain. You can create the services in the Administrator tool after installation.
    If you select to configure the services, the installer creates a Model Repository Service and a Data Integration Service in the new domain. You must specify the database for the Model repository and configure the connection to the Data Integration Service. By default, the installer starts the services when the installation completes.
  4. Choose whether to create a monitoring Model Repository Service to monitor domain statistics during installation.
  5. Choose whether to create a Content Management Service for data domain discovery during installation.
  6. Choose whether to configure the profiling warehouse connection during installation.
  7. Choose whether to create a PowerCenter Repository Service and a PowerCenter Integration Service during the installation.
If you selected to display the port configuration page, the
Port Configuration
page appears.
If you do not select to display the port configuration page, the installer displays the
Windows Service Configuration
page.

Back to Top

0 COMMENTS

We’d like to hear from you!