Performing a Partial Deployment of Configuration Changes
Performing a Partial Deployment of Configuration Changes
After you perform an initial full deployment of a replication configuration, you can deploy the configuration changes locally or to another Server Manager Main server.
Before performing a partial deployment, stop all active replication tasks that use the configuration.
Connect to the Server Manager Main server on the system from which you are deploying configuration changes.
On the
Server Manager
tab >
Configs
view, select the configuration that you want to deploy and click the
Deploy
icon button on the Replication Configurations toolbar.
The
Deploy a Configuration
wizard starts. The first
Deployment Mode and Connection Settings
page appears.
Select
Local
to deploy the configuration changes to the local Server Manager environment, or select
Remote
to deploy the configuration changes to another Server Manager environment.
For a remote deployment, specify the following Server Manager connection settings:
Host
. The host name or IP address for the Server Manager instance.
Port
. The port number. Valid values are integers from 1 through 65535.
Login
. The user name.
Password
. The password for the specified user name.
Use TLS
. Select this check box if the remote Main server uses HTTPS connections.
Then click
Test Connection
. Data Replication verifies that the remote Server Manager instance is available and that the user credentials are valid.
Click
Next
.
If you are performing a remote deployment, the Data Replication Console displays a prompt that asks you to confirm termination of all other Data Replication sessions for the specified user. Click
Yes
to continue.
The
Deployment Type
page appears.
Select
Partial deploy
.
Enter the path and file name of the deploy.properties file that you used for the last full deployment of this configuration, or click the
Browse
button to browse to this file.
Data Replication uses the settings in this file to configure the partial deployment.
Data Replication does not validate that the deploy.properties file matches the configuration that you are redeploying. Data Replication validates only that the properties specified in the file are consistent with the configuration. If you select the wrong deploy.properties file, the configuration changes will not be deployed correctly, which can cause configuration inconsistencies or corrupt the configuration.
If you do not specify a deploy.properties file, Data Replication will display a warning and prompt you to specify all of the deployment settings again.
Enter the path and directory to which you want to save the new deploy.properties file that Data Replication generates at the end of this partial deployment process, or click the
Browse
button to browse to the directory. Then click
Next
.
The
Partial Deployment Options
page appears.
To indicate the type of configuration changes to deploy, select one or more of the following options:
All
. Deploys all configuration changes to the new configuration in the destination environment, including changes to metadata, runtime settings, and extract range settings. If you select this option, you cannot select any of the other options.
Metadata
. Deploys only metadata changes to the new configuration in the destination environment. Metadata changes include table and column mappings and routing settings.
Runtime settings
. Deploys only changes that were made on the
Runtime Settings
tab to the new configuration in the destination environment. However, this option does not deploy changes from the
Runtime Settings
Calculated Columns
view.
Extract range
. Deploys only changes that were made on the
Extract Range
tab to the new configuration in the destination environment.
Default is
Metadata
.
Click
Next
.
The
Connection and Server Manager Replacement
page appears. This page displays the settings specified in the deploy.properties file that you selected. You cannot edit any of the settings on this page.
Click
Next
.
The
Schema Replacement
page appears.
If you want to replace the original schema names with other schema names in the new configuration, perform the following substeps:
Click the
New
icon button on the toolbar.
The
New Schema Replacement
dialog box appears.
In the
Connection
field, select the source or target database connection in the original configuration that includes the schema name you want to replace.
The
Original Schema
field displays the schema name for the connection you selected.
In the
New Schema
field, select the replacement schema name for the connection in the new configuration.
Click
Save
.
The connection, original schema, and new schema appear in the
Schema Replacement
list.
Repeat substeps a through d for each source or target database connection in the original configuration that includes a schema that you want to replace during deployment.
For replication configurations that have multiple targets, you can define a schema replacement pair only for the primary target.
If you define schema replacement pairs for schemas that contain tables with identical names, ensure that the schema replacement pairs do not result in the following types of configuration problems:
One table is incorrectly mapped to multiple tables.
Multiple tables are incorrectly mapped to one table.
A table is mapped to itself.
If any of these problems exist, the Data Replication Console deploys an invalid configuration to the destination environment.
To edit a schema replacement pair, click
Edit
on the toolbar.
To delete a schema replacement pair, click
Delete
on the toolbar.
Click
Next
.
The
Extract Range
page appears.
To edit the default location of the database log files that is displayed in the
Path
column and to filter the log files, perform the following substeps:
Click
Add Folder
.
To indicate the location of the log files, select one of the following options:
File system
. Use the location of the log files that you specify on the file system of the computer where the source Server Manager runs or on a network mapped share, such as NFS or Samba.
Oracle ASM
. For Oracle sources, use the location of the archived log files in ASM.
Default archive logs
. For DB2, Microsoft SQL Server, and Oracle sources, search for the log files in the database-specific location.
This option determines what is displayed in the directory tree.
Specify the directory that Data Replication scans for the database log files in one of the following ways:
In the
User-defined path
field, enter the path and directory name, and press Enter.
In the directory tree, select the directory that contains the log files.
To enable Data Replication to recursively search for log files in subfolders of the specified directory for DB2, Microsoft SQL Server, or Oracle sources, select
Scan subfolders
.
To filter the log files that Data Replication reads for DB2, Microsoft SQL Server, or Oracle sources, enter a mask for the log file names In the
Filter files
field.
To filter the binary log files that Data Replication uses for MySQL sources, enter a mask for the base name of the log files in the
Base Bin Log File Name
field.
You can use one or more of the following wildcard characters:
An asterisk (*) to match all characters
A question mark (?) to match any single character
Square brackets ([ ]) to match only one out of several characters
For example, to read all files with the .bak extension, enter *.bak.
The
Filter files
or
Base Bin Log File Name
field cannot be empty.
Click
Next
.
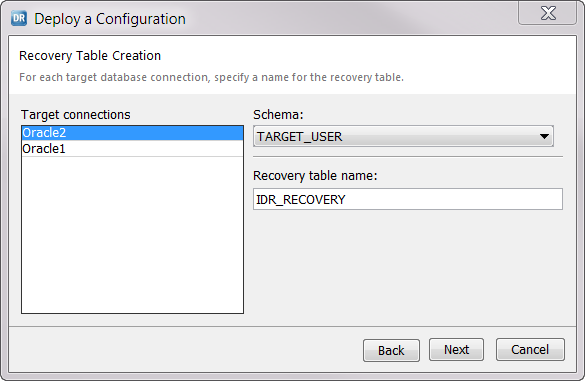
The
Recovery Table Creation
page appears if recovery tables are enabled for the configuration.
To enter information for creating a recovery table for the target in the destination environment, perform the following substeps:
In the
Target connections
list, select a target connection.
In the
Schema
list, select the schema for the table.
If the target is a Microsoft SQL Server database, select the database name in the
Database
list, and then select the
Schema
value.
In the
Recovery table name
field, enter a name for the recovery table.
The default name of the recovery table is IDR_RECOVERY.
Click
Next
.
The
Deployment Summary
page displays a summary of the deployment settings.
To change a deployment setting, click
Back
to return to the previous wizard page where you can edit the setting. After you confirm that all of the deployment settings are correct, click
Deploy
.
A progress dialog box indicates the status of deployment processing. When processing ends, the
Deployment Finished
page displays a status of Success or Failure. The page also lists the original and new configuration names and Server Managers.
Click
Close
.
Data Replication generates a deployment log file that contains error, warning, and informational messages that were issued during deployment. The deployment.log file is located in the
DataReplication_installation
/logs directory.
If you stopped any replication tasks earlier to deploy configuration changes, start the tasks again with the updated configuration.
The deployment procedure does not enable supplemental logging for DB2, Microsoft SQL Server, or Oracle source tables in the destination environment. You must enable supplemental logging for the new tables before you run data replication in the destination environment if both of the following conditions apply to the partial deployment:
You selected the
All
or
Metadata
option on the
Partial Deployment Options
page.
The partial deployment included new tables that were created after the previous deployment of the configuration.