Table of Contents

Search

  1. Preface
  2. Introduction to Informatica Connector Toolkit
  3. Before you begin
  4. Develop a connector for Cloud Data Integration
  5. Develop a connector for Data Loader
  6. Import a connector
  7. Connection attributes
  8. Type system
  9. Connector metadata
  10. Partitioning capability
  11. Pushdown capability
  12. Mappings in advanced mode
  13. Manual changes to Informatica Connector Toolkit source code
  14. Runtime behavior
  15. Connector example: MySQL_Cloud
  16. Version control integration
  17. Appendix A: Metadata models
  18. Appendix B: ASO model
  19. Appendix C: Connector project migration
  20. Appendix D: Frequently used generic APIs in Informatica Connector Toolkit
  21. Appendix E: Frequently asked questions

Cloud Data Integration Connector Toolkit Developer Guide

Cloud Data Integration Connector Toolkit Developer Guide

Create a new connector project

Create a new connector project

The connector properties describe and identify the connector in the data loader task.
Use the Informatica Connector Toolkit to create a connector project and define the connector properties.
  1. On the Eclipse IDE toolbar, click the
    Create New Connector
    button ( " " 
			 ).
    The
    Create New Connector Project
    window appears.
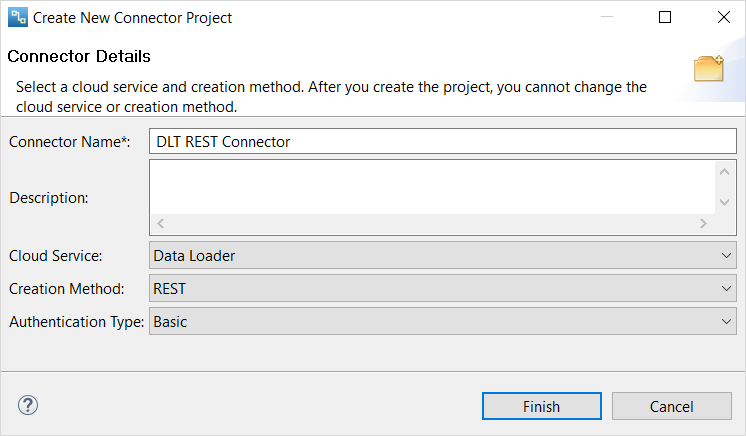
    The image shows the connector details required to create a connector
  2. In the
    Create New Connector Project
    window, configure the following properties:
    Property
    Description
    Connector Name
    Name of the connector.
    Specify a unique name for the connector.
    The connector name must be an alphanumeric string. The first character of the name must be a letter.
    Description
    Description of the connector.
    Cloud Service
    The cloud service for which you want to create a connector. Select
    Data Loader
    .
    Creation Method
    The method to create a connector.
    Select one of the following creation methods:
    • JDBC. Create a JDBC driver-based connector.
    • Libraries. Create a connector using a third-party library SDK.
    • REST. Create a connector for REST-based application.
    Default is REST.
    Authentication Type
    The authentication type for the REST creation method.
    Select one of the following authentication types:
    • No Authentication: Does not require authentication.
    • Basic. Uses the user name and password for authentication.
    • Token. Uses token-based authentication.
    • OAuth 1.0. Uses OAuth 1.0 for authentication.
    • OAuth 2.0. Uses OAuth 2.0 for authentication.
    • API Key. Uses API key for authentication.
    Default is basic authentication.
  3. If a connector with the same name already exists, the following error is displayed:
    A connector with the same name already exists. Enter a different name.
    Click
    OK
    and specify a unique name for the new connector.
  4. Click
    Finish
    .
    If the new connector is successfully registered, a success message appears.
    The image shows successful registration of the connector.
  5. Click
    OK
    .
    The new connector project appears on the
    Connector Navigator
    tab.
  6. If the connector is already registered, a warning appears. Click
    Yes
    to skip the registration process.
    The image shows the warning message if the connector already exists.

0 COMMENTS

We’d like to hear from you!