Create Custom Elasticsearch Index Settings (Optional)
Create Custom Elasticsearch Index Settings (Optional)
If the Elasticsearch index settings that Informatica provides do not meet your requirements, you can create custom index settings. The custom index settings must include analyzers, which convert text into tokens or terms that are added to the inverted index for searching.
An analyzer must have only one tokenizer, and can have zero or more character filters and token filters. Tokenizers receive a stream of characters that are converted into tokens. Token filters receive a stream of tokens generated by a tokenizer and might add, remove, or change tokens. Character filters receive a stream of characters and can add, remove, or change characters in the stream.
The tokenizer, token filters, and character filters that you use in a custom analyzer can be the Informatica default, custom, or Elasticsearch built-in components. You cannot edit the default settings. When you configure an analyzer, the Elasticsearch built-in tokenizers and token filters are available for selection.
For more information about Elasticsearch index settings, see the Elasticsearch documentation.
Log in to the Provisioning tool.
From the
Database
list, select the database for which you want to configure the Elasticsearch index settings.
Click
Configuration
Infrastructure Settings
.
The
Infrastructure Settings
page appears.
From the infrastructure settings list, select
Elasticsearch Index
, and click
Index Settings
.
The
Index Settings
appear in the tree view panel, and the
JSON Code
box for the index settings appears in the properties panel. If the index settings were not changed, the page displays the default settings.
In the
JSON Code
box, enter index settings for modules other than the
Analysis
module. Also, enter the index settings that are not associated with any specific index module, such as the number of shards, number of replicas, and refresh interval.
Configure the analyzer components, such as a tokenizer, token filters, and character filters.
In the tree view panel, select the component that you want to configure, and click
Create
.
In the properties panel, enter the name and JSON code for the component.
Click
Apply
.
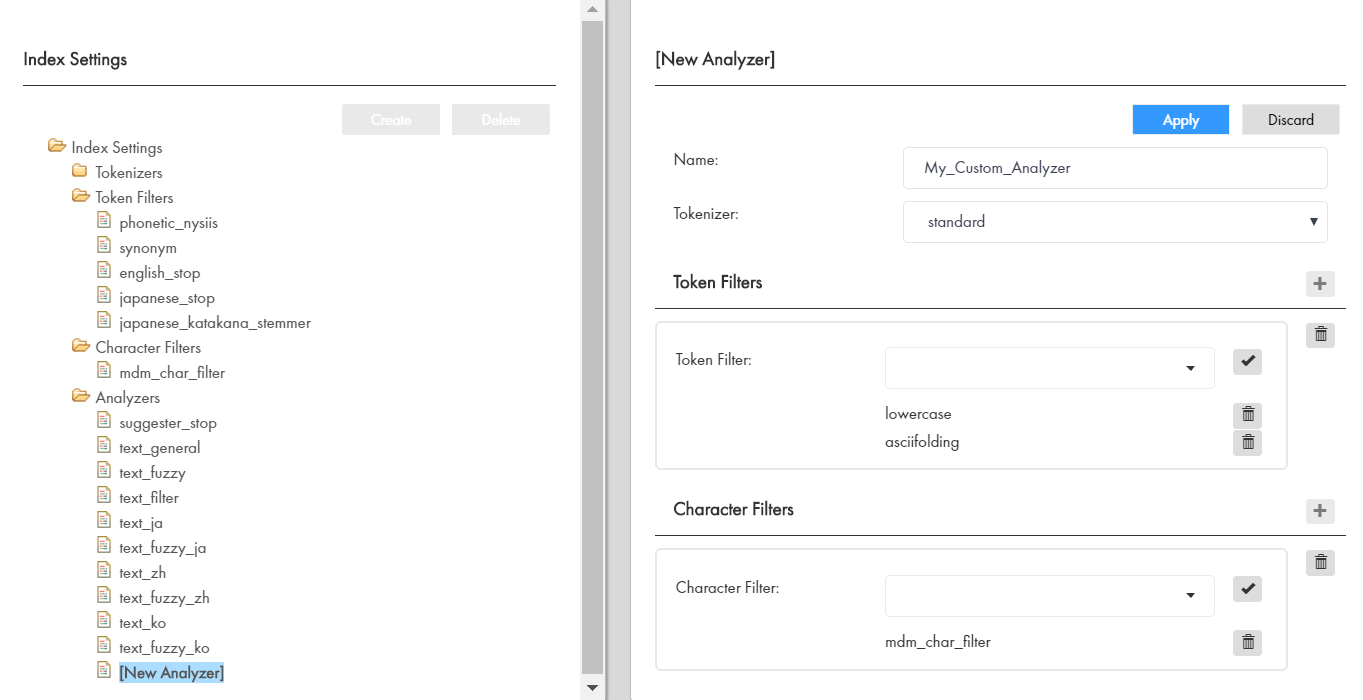
Configure an analyzer.
In the tree view panel, select
Analyzers
, and then click
Create
.
In the properties panel, specify the name, tokenizer, token filters, and character filters for the analyzer.
Ensure that you specify the token filters in the order in which you want the analyzer to use them.
The following image shows an example of a custom analyzer configuration:
Click
Apply
.
Publish the changes to the MDM Hub.
Click
Publish
.
A confirmation dialog box appears that prompts you to publish or review the changes.
Review the changes or publish without a review.
To publish without a review, click
Publish
.
To publish after a review, click
Review Changes
and follow the instructions that appear on the screen.
Review the application server logs for any validation errors related to the index settings and make changes.