Table of Contents

Search

  1. Preface
  2. Welcome to Informatica Process Developer
  3. Using Guide Developer for the First Time
  4. Getting Started with Informatica Process Developer
  5. About Interfaces Service References and Local WSDL
  6. Planning Your BPEL Process
  7. Participants
  8. Implementing a BPMN Task or Event in BPEL
  9. Implementing a BPMN Gateway or Control Flow
  10. Using Variables
  11. Attachments
  12. Using Links
  13. Data Manipulation
  14. Compensation
  15. Correlation
  16. What is Correlation
  17. What is a Correlation Set
  18. Creating Message Properties and Property Aliases
  19. Adding a Correlation Set
  20. Deleting a Correlation Set
  21. Adding Correlations to an Activity
  22. Rules for Declaring and Using Correlation Sets
  23. Correlation Sets and Engine-Managed Correlation
  24. Event Handling
  25. Fault Handling
  26. Simulating and Debugging
  27. Deploying Your Processes
  28. BPEL Unit Testing
  29. Creating POJO and XQuery Custom Functions
  30. Custom Service Interactions
  31. Process Exception Management
  32. Creating Reports for Process Server and Central
  33. Business Event Processing
  34. Process Central Forms and Configuration
  35. Building a Process with a System Service
  36. Human Tasks
  37. BPEL Faults and Reports

Designer

Designer

Adding an onAlarm Event Handler

Adding an onAlarm Event Handler

The
onAlarm
element defines a timeout event, using either the
duration (for)
or
deadline (until)
attribute. The
duration
attribute specifies the amount of time after which the event is signaled. The clock for the duration starts when the associated scope starts. The alternative
deadline
attribute sets the specific point in time when the alarm is fired. Optionally a
repeat every
attribute can be set to fire an alarm repeatedly each time the interval period expires. The
repeat every
attribute can be used alone or with an
deadline
or
duration
attribute.
For example, you might set an alarm to go off in five minutes and then repeat the alarm every 30 seconds.
An alarm time can be set for the process using the data provided within the message that creates a process instance, as shown in the following example.
In the WSDL file, a complex message is defined with a part specifying
processDuration
.
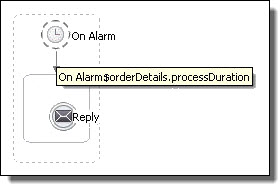
<wsdl:definitions targetNamespace="http://www.example.com/wsdl/exmple" xmlns:xsd="http://www.w3.org/2001/XMLSchema" ...> <wsdl:message name="orderDetails"> <part name="processDuration" type="xsd:duration"/> </wsdl:message> </wsdl:definitions>
The message type above is used in the
onAlarm
value in the BPEL process:
<process name="orderCar" xmlns:def="http://www.example.com/wsdl/example" ...> ... <eventHandlers> <onAlarm <for>$orderDetails.processDuration</for> </onAlarm> </eventHandlers> ... <variable name="orderDetails" messageType="def:orderDetails"/> </variable> ... <receive name="getOrder" partnerLink="buyer" operation="order" variable="orderDetails" createInstance="yes"/> ... </process>
In the above example, the
onAlarm
element specifies a timer event that is fired when the duration specified in the
processDuration
field in the
orderDetails
variable is exceeded. The value of the field is provided via the
getOrder
activity that receives a message containing the order details and causes the creation of a process instance for that order.
Required Properties
Optional Properties
Alarm Expression
Repeat Every (can be used with Alarm Type)
Alarm Type or Repeat Every
Comment.
 
Documentation.
 
Setting Visual Properties and Using Your Own Library of Images.
 
Execution State.
 
Extension Attributes and Extension Elements.
To add an onAlarm event handler for the process:
  1. Click on the Event Handlers tab of the Process Editor.
  2. Drag a
    Timer catch event
    to the Event Handler canvas.
  3. In the Properties view, optionally select the Dialog button at the end of the
    Repeat Every
    row. Type in or compose an expression for the interval. Use this attribute alone or in conjunction with a Wait Type.
  4. Set the
    Wait Type
    as one of the following:
    1. Select
      Deadline Expression
      to type in or compose an expression representing the deadline (wait until) for the alarm.
    2. Duration Expression
      to type in or compose an expression representing the duration (wait for) for the alarm.
    3. Duration
      to select the number of days, hours, minutes, or seconds to wait.
    4. T time in X days to set a deadline that is X days plus T hours. The expression resolves to an expression such as:
      x
      sd:dateTime(current-date()) + xsd:dayTimeDuration("P3DT15H20S")
  5. Drag an activity into the event handler to respond to the event, such as a reply or exit.
  6. Fill in the properties for the activity that handles the event.
The following illustration shows an example of an
onAlarm
event handler added for the process.
Tip:
If you collapse the event handler, you can add a background color in the Properties view.
To add an onAlarm event handler for a scope:
  1. Display a BPEL file in the Process Editor, and select a scope.
  2. Drag a
    Timer catch event
    to the scope.
  3. In the Properties view, fill in properties as described above for the process.
  4. Drag an activity into the event handler to respond to the event, such as a reply or terminate.
  5. Fill in the properties for the activity that handles the event.
The following illustration shows an example of an
onAlarm
and an
onEvent
event handler added for a scope. The activity responding to each event is a reply.

0 COMMENTS

We’d like to hear from you!