Table of Contents

Search

  1. Preface
  2. Document Processing
  3. Operation Console
  4. Partners and Profiles
  5. On-Boarding Checklists
  6. Managed File Transfer Web Users
  7. Managed File Transfer Connections
  8. Endpoints
  9. Events
  10. Event Monitors
  11. Reconciliations
  12. Event Resubmission
  13. Audit and Authorization
  14. Advanced Exception Handling
  15. Dashboard and Reports
  16. Service Level Agreement Management
  17. Glossary

Setting Up Delayed Processing Rules

Setting Up Delayed Processing Rules

To configure delayed processing rules for a profile:
  1. On the Navigator, click Partner Management > Profiles.
    The Profiles page appears.
  2. Click the Edit icon of the relevant profile.
    The Update Profile page appears.
  3. Click Delayed Processing.
    The Delayed Processing page appears. Use this page to define the delay rules relevant to this profile.
  4. Timing rules define time-related processing rules. You can define one timing rule for each profile. To define a timing rule, click the Timing Rules Add button and select the rule.
    The Add list opens.
  5. A scheduling rule defines a processing period. A schedule in the system defines the start time and the rule defines the length of scheduled time. When the processing period commences,
    B2B Data Exchange
    evaluates the scheduling rules every minute. When rule conditions are met,
    B2B Data Exchange
    releases the delayed events.
    To configure a scheduling rule, select Scheduling Rule from the list.
    The New Scheduling Rule page appears.
  6. Enter the following fields in the page:
    Field
    Description
    Rule name
    The name of the rule.
    Select schedule
    Select a schedule from the list of defined schedules. The property indicates the starting point of the processing window.
    For more information about creating schedules, see
    B2B Data Exchange
    Administrator Guide
    .
    If mandatory rules are not met within
    Number + time units (minutes, days, hours), for example, which delay rules are checked at frequent intervals.
    Wait for the next processing window
    Hold delayed events for the next processing window.
    Discard delayed events
    Discard delayed events.
    Generate error event
    Generate an error event if mandatory rules are not met within the processing period.
    Click Save.
  7. A timeout rule defines the maximum time that events sent to this profile can be delayed.
    To configure a timeout rule, select Timeout Rule from the list of rules.
    The New Timeout Rule page appears.
  8. Enter the following fields in the page:
    Field
    Description
    Rule name
    The name of the rule.
    Do not delay events for more than
    Number and time units (minutes, days, hours), for example, 2 hours. This property indicates the maximum delay time.
    Change to manual release mode
    Event release is manual. Automatic event release is disabled. Manual (operator) release is possible by clicking the Release icon on the Profile page, or selecting the Release action on the Event List page.
    Discard delayed events
    Discard delayed events.
    Generate error event
    Generate an error event if mandatory rules are not met with the processing period.
    Click Save.
  9. Delay rules define how events are delayed and what conditions trigger their release. Multiple delay rules can be defined for a single profile.
    To set up a delay rule, click the Delay Rules > Add Rule button.
    The list of rules opens.
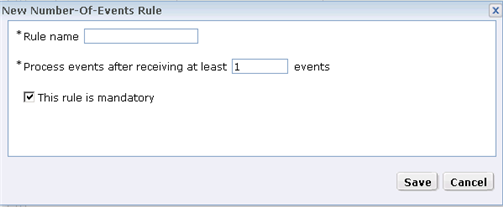
  10. The Number of Events Rule defines the minimum number of events that need to be received and delayed before they can be released.
    To configure a Number of Events rule, select Number of Events rule from the rules list.
    The New Number of Events page appears.
  11. Fill in the fields in the page as follows:
    Field
    Description
    Rule name
    The name of the rule.
    Process events after receiving at least N events
    The minimum number of events to be delayed before release.
    This rule is mandatory
    If mandatory, the conditions of the rule must be met in order to release the delayed events.
    Click Save.
  12. A Specific Event rule delays events according to an event attribute.
    To configure a Specific Event rule, select Specific Event Rule from the list of rules.
    The New Specific Event Rule page appears.
  13. Fill in the fields on the page as follows:
    Field
    Description
    Rule name
    The name of the rule.
    Process events after receiving at least one event where
    Select an event attribute from the list.
    Is (equal to)
    A value for the selected event attribute that will cause delayed events to be released.
    This rule is mandatory
    If mandatory, the conditions of the rule must be met in order to release the delayed events.
    Click Save.
  14. A combination rule is an advanced rule that offers delayed event release according to a number of conditions.
    To configure a combination rule, select Combination Rule from the list of rules.
    The New Combination Rule page appears.
    Field
    Description
    Rule name
    The name of the rule.
    Number of delayed events reaches <value>.
    The number of delayed events that must accumulate before they can be released for processing.
    Accumulated <Event Attribute > is <value>.
    Delay events when the accumulated value of <Event Attribute> reaches <value>.
    For events where <Event Attribute> is <value>
    The number of delayed events or the accumulated value is calculated for events having <Event Attribute> = <value>.
    This rule is mandatory
    If mandatory, the conditions of the rule must be met in order to release the delayed events.
  15. Select whether to release events according to the number of events delayed or according to the cumulative total value of some event attribute of the delayed events. For example, you can release events when five have arrived, or when the total payment amount of all delayed events reaches $4,500.
    Fill in the fields in the page as follows:
    • To release events according to the number of delayed events: Select Number of delayed events and enter the threshold value into the Reaches field.
    • To release events based on the accumulated value of some event attribute: Select Accumulated, select an event attribute from the list, and enter the threshold value into the Is field. For example, select the event attribute Payment Amount from the list and enter 4500 into the Is field.
    • To restrict the number of events or the accumulated value of events based on an event attribute, check "For events where", select an event attribute from the list and fill in the attribute value, for example, "For events where document type" is <invoice>.
    • Check "This rule is mandatory" to make the rule mandatory.
    • Click Save.
  16. A By Event Attribute rule is used to re-group events based on a specific event attribute.
    To configure a By Event Attribute rule, select By Event Rule from the list of rules.
    The New By Event Attribute Rule page appears.
  17. Fill in the fields in the page as follows:
    Field
    Description
    Rule name
    The name of the rule.
    Group events by
    Select an event attribute from the list. The events will be grouped by the selected event attribute.
    Determine group size using
    Select an event attribute from the list. The numerical value of this attribute is the group size.
    This rule is mandatory
    If mandatory, the conditions of the rule must be met in order to release the delayed events.
    Click Save.
  18. Release rules define the conditions for delayed event release.
    To define a release rule, click the Release Rules Add Rule button and select a rule from the list.
    The list of rules opens.
  19. The Release-As-One-Rule page appears. This rule combines all the delayed events for the profile into one single event and releases it for processing.
    To define a Release as One rule, select Release-As-One Rule from the new rules list.
    The Release-As-One Rule page appears.
  20. Fill in the fields in the Release as One Rule page, as follows:
    Field
    Description
    Rule name
    The name of the rule.
    Concatenate events documents ...
    Select to combine input documents of all delayed events into one document.
    Separate documents with
    Enter a string for separating aggregated documents one from another.
    Store the aggregated document ...
    Send the aggregated message to the workflow as a file pointer. Use this option if the aggregated message is expected to be very large and you don't want to submit it through the queue.
    Prepare input files lists for a PowerCenter workflow
    As an alternative to concatenating source documents into a single file, you can choose to prepare a list of input files and pass it by reference (using the file source name that you select) to a PowerCenter batch workflow that expects an indirect set of sources.
    Determine the file source name using
    Select an event attribute name from the list. This attribute holds the file source name.
    Pass the original Event ID to PowerCenter workflow
    Add a second column to the list of input files with the original Event ID for each source file.
    Click Save.
  21. A Max Volume rule determines the maximum number of events to release in one batch.
    To create a maximum volume rule, select Max Volume from the list of rules.
    The New Max Volume Rule page appears.
  22. Fill in the fields in the page as follows:
    Field
    Description
    Rule name
    The name of the rule.
    Process events in groups of
    Fill in a numerical group size.
    Click Save.
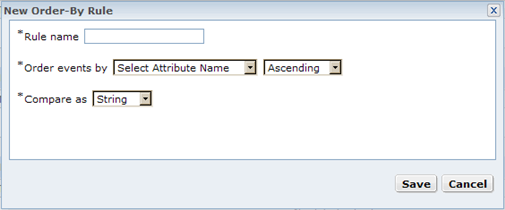
  23. An order by rule defines how to order the released events.
    To define an order by rule, select Order-By Rule from the list of rules.
    The New Order-By Rule page appears:
  24. Fill in the fields in the page as follows:
    Field
    Description
    Rule name
    The name of the rule.
    Order events by
    Select an event attribute name from the list. The released events are ordered by the selected event attribute.
    Order
    Select ascending or descending order.
    Compare as
    Chose the data format of the selected event attribute for sorting the released events: string, date, or numeric.
    Click Save.
  25. To delay all events and release them manually, select the Delay-All-Events (with manual release) checkbox from the top of the Update Profile page.
    The operator can release events manually:
    • In the Navigator, click Partner Management > Profiles. Select a profile and click Actions > Release Delayed Events.
    • In the Navigator, click Events > All Events > Advanced Search. Select the events to be released. Click Actions > Release.

0 COMMENTS

We’d like to hear from you!