Table of Contents

Search

  1. Preface
  2. Document Processing
  3. Operation Console
  4. Partners and Profiles
  5. On-Boarding Checklists
  6. Managed File Transfer Web Users
  7. Managed File Transfer Connections
  8. Endpoints
  9. Events
  10. Event Monitors
  11. Reconciliations
  12. Event Resubmission
  13. Audit and Authorization
  14. Advanced Exception Handling
  15. Dashboard and Reports
  16. Service Level Agreement Management
  17. Glossary

Creating a Reconciliation Monitor

Creating a Reconciliation Monitor

You can monitor reconciliation status in the same way you monitor event type and status.
  1. In the Navigator, click
    Event Monitors
    Monitors
    .
  2. Click
    New Monitor
    .
  3. The Create Monitor page appears.
  4. Enter a name for the reconciliation monitor.
  5. Select the reconciliation status to monitor.
    You can create the following types of reconciliation monitors:
    Monitor
    Description
    Timed out
    Change the reconciliation status of the specified events to
    Timed out
    if no acknowledgment was received for the event within the time limit.
    After timeout
    Change the reconciliation status of the specified events to
    After timeout
    if an acknowledgement was received for the event after the time limit.
    You can monitor only event type and status or reconciliation status, but not both. If you want to define an event monitor, follow the steps in Creating an Event Monitor.
  6. To monitor event reconciliations associated with a specific partner, select the radio button next to the
    Partner
    field, click
    Browse
    , and select a partner from the list.
  7. To monitor event reconciliations associated with one or more accounts for the selected partner, select an account from the list. Use the
    Shift
    key to select multiple accounts.
  8. To monitor event reconciliations associated with a specific workflow, click the radio button next to the
    Workflow
    list, click
    Browse
    , and select one or more workflows from the list.
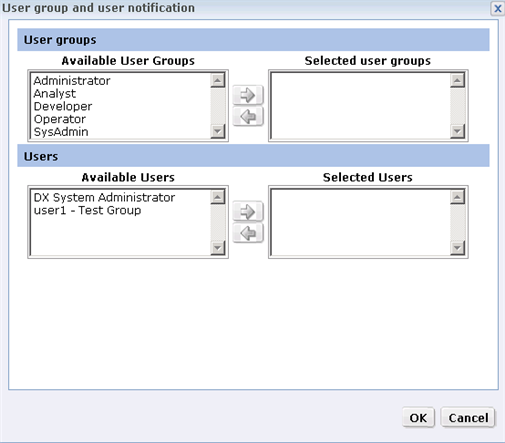
  9. To specify the user accounts and user groups to notify, click
    Users and User Groups
    and select from the lists.
    You can choose multiple users and multiple user groups. When you select a user group, all the users in that group are notified.
  10. Select the action that the Data Exchange Server should take when the monitor reports events that match the monitor criteria:
    Action After Notification
    Description
    Deliver event only
    Add the event to the list of events in the event monitor and display the event in the console.
    Deliver event and send email
    Add the event to the list of events in the event monitor and send an email to the selected users.
    Deliver event and run workflow
    Add the event to the list of events in the event monitor and run a workflow. Click the
    Select Workflow
    button to select the workflow to run after the delivery.
    Deliver event and run profile
    Add the event to the list of events in the event monitor and run a workflow associated with a profile. Click the
    Select Profile
    button to select a partner, account, and profile. After delivery, the Data Exchange Server runs the workflow associated with the selected profile.
    Deliver event and create issue
    Add the event to the list of events in the event monitor and create an advanced exception handling issue.
    Batch notification
    Select to send a single email that contains a list of all events that the monitor found. Otherwise, each event is sent in a separate email.
    The maximum number of events that can be sent in a single email is 200. If more than 200 events are found, the notifications are sent in multiple emails.
    To send email notifications, you must configure a mail server for B2B Data Exchange. For more information, see the
    B2B Data Exchange Installation and Configuration Guide
    . The user account to which you send email notifications must have valid email addresses.
  11. Select the priority level for email notifications from the
    Select Priority
    list.
  12. To change the status of the events that the monitor reports, select
    Change event status
    and select a status from the
    Target event status
    list.
  13. To suspend monitor activity on holidays, select the name of the calendar that contains the relevant holidays from the
    Holiday Calendar
    list.
  14. Select the frequency at which the monitor runs:
    Frequency
    Description
    Disabled
    Do not run the monitor according to a schedule. When a monitor is disabled, you cannot run the monitor.
    Custom
    Run the monitor in a specific time interval in hours and minutes.
    Daily
    Run the monitor at a specific time every day.
    Weekly
    Run the monitor at a specific hour once a week. If a scheduled run occurs on a holiday, select the action that the Data Exchange Server performs:
    • Skip run.
      Do not run the monitor during the holiday week. The Data Exchange Server runs the monitor the following week.
    • Run before holiday
      . Run the monitor one day before the day of the scheduled run.
    • Run after holiday.
      Run the monitor one day after the day of the scheduled run.
    Monthly
    Run the monitor at a specific hour once a month. . When a scheduled run falls on a holiday, select the action that the Data Exchange Server performs:
    • Skip run.
      Do not run the monitor during the holiday month. The Data Exchange Server runs the monitor the following week.
    • Run before holiday
      . Run the monitor one day before the day of the scheduled run.
    • Run after holiday.
      Run the monitor one day after the day of the scheduled run.
  15. Click
    Save
    .

0 COMMENTS

We’d like to hear from you!